Limited Time Offer!
For Less Than the Cost of a Starbucks Coffee, Access All DevOpsSchool Videos on YouTube Unlimitedly.
Master DevOps, SRE, DevSecOps Skills!
Keycloak is an open-source identity and access management solution. It allows you to secure applications and services by managing users, roles, and permissions. One of the essential concepts in Keycloak is realm roles, which provide a global method for managing user permissions within a specific realm. This tutorial will walk you through the concept of realm roles, how to configure them, how to assign them to users, and common errors that developers encounter when working with realm roles in Keycloak.
Introduction to Keycloak Realm Roles
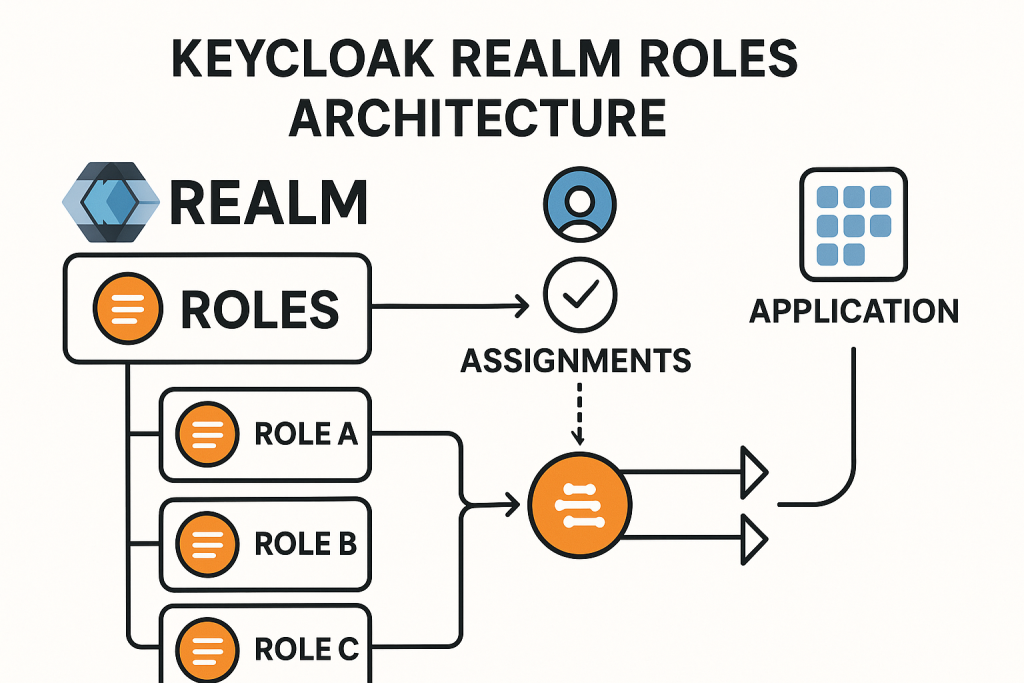
A realm in Keycloak is a space where you manage users, applications (clients), roles, and permissions. Realm roles are roles that apply globally within a realm, meaning they can be used across multiple clients (applications) within that realm. Unlike client roles (which are specific to an individual application), realm roles are shared across all the applications within the same realm.
Benefits of Realm Roles:
- Global Permissions: Realm roles are not tied to a specific application, making them ideal for global permissions that should be recognized across multiple applications.
- Role Management: Simplifies role management by allowing you to assign and manage permissions at the realm level instead of individual client level.
- RBAC: Realm roles are often used in Role-Based Access Control (RBAC) to define what a user can or cannot do within the realm.
Setting Up Keycloak
Before diving into realm roles, ensure that your Keycloak instance is set up. If you don’t have Keycloak installed yet, follow these steps:
Step-by-Step Keycloak Setup:
- Download and Run Keycloak:
- Download the latest version of Keycloak from the official website.
- Run Keycloak using the command:
./bin/standalone.sh
- Access Keycloak Admin Console:
- Open your browser and go to
http://localhost:8080/authto access the Keycloak Admin Console. - The default username is
admin, and the password is set during the first setup.
- Open your browser and go to
- Create a Realm:
- Log into the Admin Console, go to the Master drop-down in the top-left corner, and select Add Realm.
- Enter a name for your new realm and save.
Creating Realm Roles
Steps to Create Realm Roles:
- Navigate to the Roles Section:
- In the Keycloak Admin Console, select your realm from the top-left corner.
- Go to Roles in the left navigation panel.
- Click Add Role.
- Create a Role:
- Provide a name for your role (e.g., “admin”, “manager”, “user”).
- Optionally, provide a description to make the role’s purpose clear.
- Click Save.
- Composite Roles:
- If you need to combine multiple roles, you can create a composite role that contains other roles inside it.
- To do this, when creating a role, select the Composite Roles tab and assign other roles as part of the new role.
Example:
Let’s create a role called admin:
- Role Name:
admin - Description:
Admin role with full access to all resources
Assigning Realm Roles to Users
Once the realm roles are created, you can assign them to individual users.
Steps to Assign Realm Roles to Users:
- Navigate to Users Section:
- In the Admin Console, go to Users and search for the user you want to assign the role to.
- Select the user and click on the Role Mappings tab.
- Assign Roles:
- Under the Available Roles section, select the roles you want to assign (e.g.,
admin). - Click Add Selected to assign the role to the user.
- Under the Available Roles section, select the roles you want to assign (e.g.,
- Verify Role Assignment:
- Once assigned, the role will appear under Assigned Roles.
Using Realm Roles in Applications (Clients)
Once a realm role is assigned to a user, it can be used to control access to resources in applications (clients) that are configured within the realm. This is where Role-Based Access Control (RBAC) comes into play.
Steps to Use Realm Roles in Applications:
- Map Realm Roles to Client Roles:
- Navigate to the Clients section in the Admin Console.
- Select the client (application) you want to map the realm role to.
- Go to the Role Mappings tab and add the desired realm role.
- Read Roles in Application Code:
- In your application, you can read the roles from the JWT (JSON Web Token) issued by Keycloak.
- The roles are typically present in the
realm_accessclaim in the token.
Example of JWT with Realm Roles:
{
  "realm_access": {
    "roles": ["admin", "user"]
  }
}
In your application, you can check if the user has the admin role and grant access accordingly.
Role Mapping and Role Inheritance
Keycloak allows role inheritance through composite roles. A composite role can contain other roles, which makes role management more efficient.
Example of Composite Roles:
- Create a composite role called
superadminwhich includes theadminandmanagerroles.
Benefits of Role Inheritance:
- Simplifies role assignments by grouping related roles together.
- Ensures that users who require multiple permissions can have them all assigned through a single role.
Working with Role-Based Access Control (RBAC)
Role-based access control (RBAC) is a critical feature when using realm roles. RBAC allows you to define what resources a user can access based on the roles they have been assigned.
Steps to Implement RBAC with Keycloak:
- Define Role-Based Permissions:
- Identify the different roles (e.g., admin, user, manager) in your application.
- For each role, define the permissions required (e.g., read-only access, admin access).
- Map Roles to Resources:
- Assign specific roles to users based on the resources or actions they should be able to access.
Common Errors and Troubleshooting
Here are some common errors developers encounter when working with realm roles in Keycloak, along with troubleshooting tips:
Error 1: “Roles are not being passed in the token”
- Cause: The realm roles are not included in the JWT token.
- Solution: Ensure that the client has the correct settings to include realm roles in the token. In the Client settings, make sure Client Scopes are configured to include roles.
Error 2: “Role not found”
- Cause: The role might not be created or assigned properly.
- Solution: Double-check that the role exists in the Roles section and ensure that it’s correctly assigned to the user.
Error 3: “Permission denied, user doesn’t have the required role”
- Cause: The user doesn’t have the correct roles assigned or they are not mapped properly.
- Solution: Verify that the role is correctly assigned to the user. Check the Role Mappings tab under the user profile to ensure the role is correctly assigned.
Error 4: “Role not recognized by client”
- Cause: The client is not recognizing the realm role because it has not been mapped to a client role.
- Solution: Go to the Clients section and ensure that the realm role is mapped to the client role.
Best Practices and Security Considerations
- Use Composite Roles: For efficient role management, use composite roles to group multiple roles together.
- Limit Roles: Assign only necessary roles to users. Following the principle of least privilege will minimize security risks.
- Regular Audits: Periodically review user roles and permissions to ensure that no unnecessary roles are assigned to users.
- Token Expiry: Set appropriate token expiry and refresh intervals to mitigate the risk of compromised tokens.
Conclusion
Keycloak provides a powerful and flexible mechanism for managing roles and permissions using realm roles. By defining roles at the realm level, you can easily manage user access to resources across multiple applications. This tutorial has covered everything from creating and assigning realm roles to troubleshooting common errors. By following best practices and understanding the underlying mechanisms, you can secure your applications effectively using Keycloak.
For more advanced use cases, consider integrating with client roles, composite roles, and Role-Based Access Control (RBAC) to provide even more granular access control.