Limited Time Offer!
For Less Than the Cost of a Starbucks Coffee, Access All DevOpsSchool Videos on YouTube Unlimitedly.
Master DevOps, SRE, DevSecOps Skills!
What you’re doing (in one line)
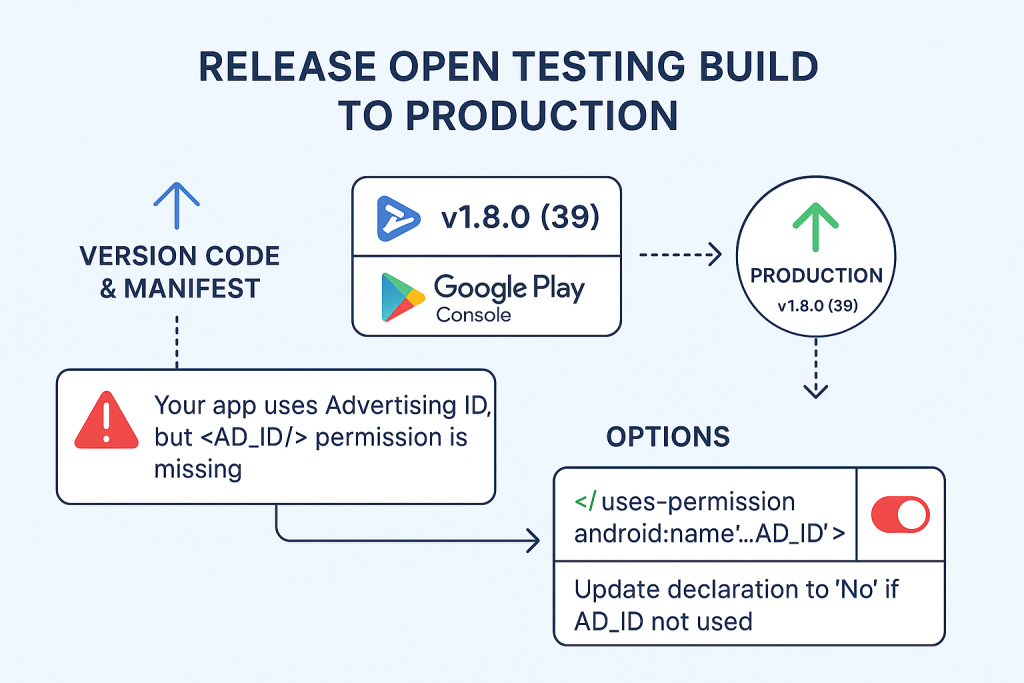
You already uploaded 1.8.0 (versionCode 39) to Open testing. You want to publish the same build (or a minor update) to Production. You can’t “move” it; you reuse the same .aab (or upload a new one with a higher versionCode) to create a Production release.
Pre-flight Checklist (do these first)
Project files
android/app/src/main/AndroidManifest.xmlis valid (see AD_ID note below).android/app/build.gradlehas correctapplicationId,minSdkVersion,targetSdkVersion, and uniqueversionCode.
Play Console
- App content → Data safety, Ads/Monetization, Privacy policy, Content rating are filled.
- Store listing (title, short+full description, screenshots, icon, feature image) done.
- App integrity: Play App Signing is set up (recommended).
- Policy: no unresolved policy issues.
Tip: Take 2 minutes to open Policy → App content and ensure every section has a green check.
Fixing the common “Advertising ID (AD_ID)” error
What is Advertising ID?
A resettable device identifier that ad/analytics SDKs use for personalization, attribution, and fraud prevention.
Why Play Console complains
- You declared “App uses Advertising ID” in App content, but your app manifest lacks the permission.
- On Android 13+ (API 33), without the permission, the ID gets zeroed out.
Choose ONE path
A) Your app (or SDKs like AdMob, AppsFlyer, Adjust, some analytics) use Ad ID → Add permission
Copy-paste this outside <application> in AndroidManifest.xml:
<manifest xmlns:android="http://schemas.android.com/apk/res/android">
    <!-- Advertising ID permission (Android 13+) -->
    <uses-permission android:name="com.google.android.gms.permission.AD_ID" />

    <application
        android:label="professional"
        android:name="${applicationName}"
        android:enableOnBackInvokedCallback="true"
        android:icon="@mipmap/ic_launcher">
        <!-- ... your existing activity/meta-data ... -->
    </application>

    <queries>
        <intent>
            <action android:name="android.intent.action.PROCESS_TEXT"/>
            <data android:mimeType="text/plain"/>
        </intent>
    </queries>
</manifest>
Then rebuild and upload (you must bump versionCode, see Section 4).
B) Your app does NOT use Ad ID → Update declaration
- Play Console → Policy → App content → Advertising ID
- Select “No, my app does not use the Advertising ID.”
- Save. No manifest change needed.
⚠️ If you claim “No” but an SDK reads Ad ID, review may fail. Be honest.
Other frequent Play Console blockers (and fixes)
- Duplicate versionCode / “You need to use a different version code”
- Fix: Increment
versionCodeinandroid/app/build.gradle:
defaultConfig { applicationId "com.professnow.professional" minSdkVersion flutter.minSdkVersion targetSdkVersion flutter.targetSdkVersion versionCode 40 versionName "1.8.1" } - Fix: Increment
- Target API requirement (e.g., must target Android 14 / API 34)
- Fix: In
android/app/build.gradleorandroid/gradle.properties(Flutter 3.22+), settargetSdkVersion 34. - If you use a recent Flutter,
flutter.targetSdkVersionusually aligns; otherwise set explicitly.
- Fix: In
- Data safety form incomplete or mismatched
- Fix: Fill exactly what SDKs collect/share. If you use Firebase/AdMob/Analytics, include them.
- Privacy policy missing (especially if you collect personal data or show ads)
- Fix: Add a public URL (website/GitHub Pages) that clearly explains data usage.
- App signing mismatch
- Fix: Enable Play App Signing and keep your upload key safe. Don’t change keystores mid-life.
- “Release without permission” warning for AD_ID
- Fix: Either add
AD_IDpermission (if used) or declare “No” in App content (if not used). Don’t ignore.
- Fix: Either add
- Policy rejections (Device/Network abuse, Deceptive behavior, etc.)
- Fix: Read the rejection email, fix the exact APK behavior, and resubmit.
Build & Upload (Flutter)
# from your Flutter project root
flutter clean
flutter pub get

# (optional) verify Gradle/SDK versions if prompted
# Update versionCode/versionName in android/app/build.gradle FIRST

# Build Play App Bundle (.aab)
flutter build appbundle
# output: build/app/outputs/bundle/release/app-release.aab
Upload the .aab in Play Console during Production → Create new release.
Reusing the Open-Testing AAB for Production
You can reuse the same artifact:
- Production → Create new release → Reuse app bundle from a previous release → pick
1.8.0 (39) - If you changed code/manifest, you must upload a new AAB with a higher versionCode (e.g.,
40).
Play Console: Step-by-step to Production
- Open app → left nav Release → Production.
- Click Create new release.
- App bundles:
- Reuse previous (select
39) or click Upload a new.aab(withversionCode 40+).
- Reuse previous (select
- Release details:
- Name (e.g.,
1.8.1) - Release notes (see template below)
- Name (e.g.,
- Review release:
- Fix errors/warnings (AD_ID, Data safety, Target API, etc.).
- Start rollout to Production:
- Choose staged rollout (e.g., 10%) or 100% if confident.
- Submit and wait for review.
Copy-paste snippets you’ll likely need
AndroidManifest.xml (with AD_ID)
<manifest xmlns:android="http://schemas.android.com/apk/res/android">
    <uses-permission android:name="com.google.android.gms.permission.AD_ID" />

    <application
        android:label="professional"
        android:name="${applicationName}"
        android:enableOnBackInvokedCallback="true"
        android:icon="@mipmap/ic_launcher">

        <activity
            android:name="com.professnow.professional.MainActivity"
            android:exported="true"
            android:launchMode="singleTop"
            android:taskAffinity=""
            android:theme="@style/LaunchTheme"
            android:configChanges="orientation|keyboardHidden|keyboard|screenSize|smallestScreenSize|locale|layoutDirection|fontScale|screenLayout|density|uiMode"
            android:hardwareAccelerated="true"
            android:windowSoftInputMode="adjustResize">
            <meta-data
                android:name="io.flutter.embedding.android.NormalTheme"
                android:resource="@style/NormalTheme" />
            <intent-filter>
                <action android:name="android.intent.action.MAIN"/>
                <category android:name="android.intent.category.LAUNCHER"/>
            </intent-filter>
        </activity>

        <meta-data
            android:name="flutterEmbedding"
            android:value="2" />
    </application>

    <queries>
        <intent>
            <action android:name="android.intent.action.PROCESS_TEXT"/>
            <data android:mimeType="text/plain"/>
        </intent>
    </queries>
</manifest>
build.gradle (app) – bump version
android {
    defaultConfig {
        applicationId "com.professnow.professional"
        minSdkVersion 21          // match your project needs
        targetSdkVersion 34       // meet Play requirement
        versionCode 40            // increment every upload
        versionName "1.8.1"
    }
    // ...
}
Release notes template (paste in Play Console)
What’s new in 1.8.1
• Stability improvements and minor bug fixes
• Polished onboarding and performance on low-memory devices
• Updated dependencies and compliance (Android 13/14)
Troubleshooting table (quick fixes)
| Symptom / Error | Cause | Fix |
|---|---|---|
| “App uses Advertising ID but permission missing” | Declared AD_ID usage but no manifest permission | Add <uses-permission android:name="com.google.android.gms.permission.AD_ID" /> or declare “No” in App content |
| “Use a different version code” | Same versionCode already used | Increase versionCode (e.g., 39 → 40) |
| “Target API level too low” | targetSdkVersion < required | Set targetSdkVersion 34 |
| “Data safety incomplete” | Forms not filled accurately | Complete Data safety with actual SDK usage |
| “Privacy policy required” | Collects data / shows ads | Provide a hosted privacy policy URL |
| “App signing error” | Keystore mismatch | Use Play App Signing; keep upload key consistent |
| “Review rejected (policy violation)” | Behavior or metadata issues | Read email reason, fix code/content, resubmit |
| “App not visible to everyone after release” | Staged rollout | Increase rollout % after verifying metrics |
Best practices before you click “Submit”
- Test release build locally:
flutter build appbundlethen install an APK split or test via Internal testing. - Verify deep links, Google Sign-In, in-app updates/billing if used.
- Keep changelogs short & clear; avoid mentioning internal IDs or sensitive info.
- Consider staged rollout 10–20% first. Watch ANRs/crashes in Android vitals.
FAQ (fast answers)
Q: Can I move Open testing release to Production directly?
A: No “move” button. Create a new Production release and reuse the same AAB or upload a new one.
Q: Do I need to rebuild if I just add the AD_ID permission?
A: Yes—manifest changes require building a new AAB with a higher versionCode.
Q: I don’t show ads—do I still need AD_ID?
A: No. If no SDK reads Ad ID, set App content → Advertising ID = No and don’t add the permission.
Q: How long does review take?
A: Varies (hours to a few days). First releases or policy-sensitive apps may take longer.
One-page “Do it now” checklist
- Decide AD_ID path (add permission or declare “No”).
- Update
AndroidManifest.xml(if needed). - Bump
versionCode(andversionName). flutter clean && flutter pub get && flutter build appbundle.- Play Console → Production → Create new release → Upload or Reuse AAB.
- Fill release notes → Review → Fix errors/warnings.
- Start staged rollout (10–20%) → Monitor → Rollout to 100%.