Skip to content
Menu
DevSecOps Now!!!
  • About
  • Certifications
  • Contact
  • Courses
  • DevSecOps Consulting
  • DevSecOps Tools
  • Training
  • Tutorials
DevSecOps Now!!!

How to Configure Blogger page for Business. Step by Step Guide

Posted on February 10, 2025

Limited Time Offer!

For Less Than the Cost of a Starbucks Coffee, Access All DevOpsSchool Videos on YouTube Unlimitedly.
Master DevOps, SRE, DevSecOps Skills!

Enroll Now

Blogger is a free and easy-to-use platform by Google that allows businesses to create and manage a blog without any technical expertise. Whether you’re a small business owner, freelancer, or entrepreneur, having a Blogger page can help you showcase your expertise, improve SEO, and attract potential customers.

If you’re looking to create a Blogger page for your business, this step-by-step guide will walk you through everythingโ€”from setting up your blog to customizing it for a professional look and optimizing it for growth.


Step 1: Create a Blogger Account

Since Blogger is a Google-owned platform, you need a Google account to sign up. If you donโ€™t already have one, you can create it at Google.com.

How to Set Up Your Blogger Page:

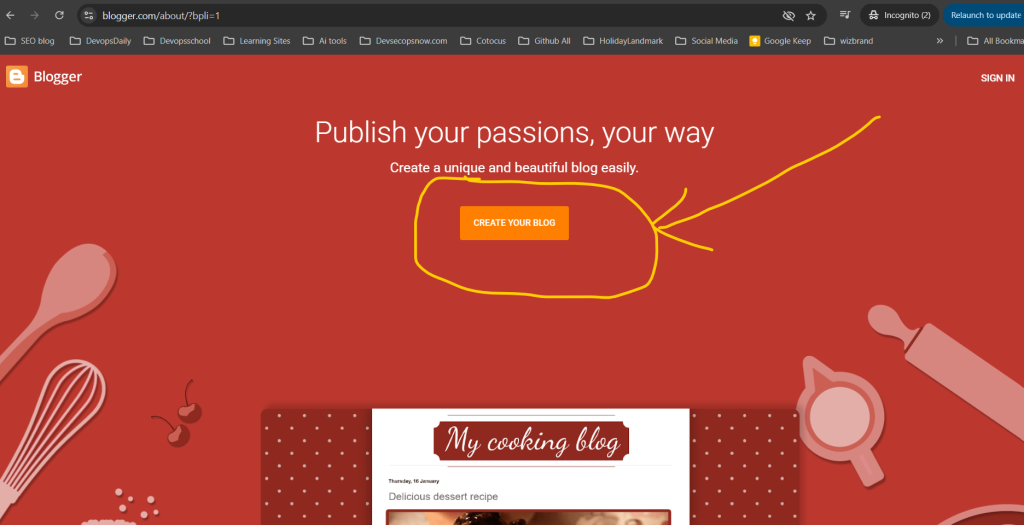
  1. Go to Blogger.com and sign in with your Google account.
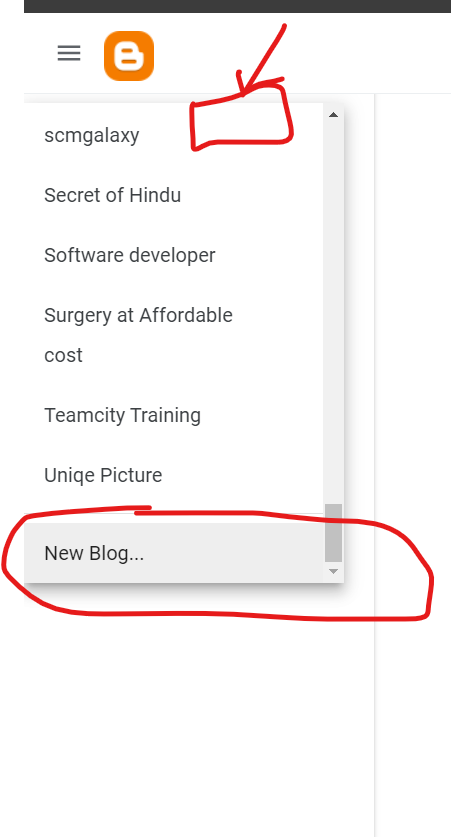
  2. Click on “Create a New Blog.”
  3. Choose a blog name that represents your business. This will be your blogโ€™s title.
  4. Select a custom URL (e.g., YourBusinessName.blogspot.com). If you want a professional look, you can later set up a custom domain (e.g., YourBusinessName.com).
  5. Choose a blog template from the available options (you can customize this later).
  6. Click “Create Blog.”

Congratulations! You now have a Blogger page ready to be customized.


Step 2: Customize Your Blogger Page for a Professional Look

Now that your blog is created, itโ€™s time to make it visually appealing and user-friendly.

1. Choose a Business-Friendly Theme

Blogger provides free themes, but they may look too basic. To create a more professional website:

  • Click on “Theme” in the left sidebar.
  • Choose from Bloggerโ€™s built-in themes or upload a third-party theme from sites like ThemeForest or GooyaabiTemplates.

2. Customize Your Blog Layout

  • Go to “Layout” in the left menu.
  • Add or remove widgets like About Us, Contact, Social Media Links, and Popular Posts.
  • Drag and drop elements to adjust the layout for a clean, organized look.

3. Add a Custom Logo and Favicon

  • Click on “Layout” > “Header” > “Edit” to upload your business logo.
  • For a favicon (the small icon next to your blogโ€™s name in the browser tab), click “Settings” > “Basic” > “Favicon” and upload a 16×16 pixel logo.

4. Set Up Pages for Important Business Information

A business blog should include essential pages such as:

  • About Us โ€“ Describe your company and its mission.
  • Contact โ€“ Provide an email, phone number, or form for inquiries.
  • Services/Products โ€“ List what your business offers.
  • Privacy Policy & Terms โ€“ Important for credibility and legal compliance.

To create pages:

  1. Click on “Pages” in the left menu.
  2. Click “New Page”, add content, and publish.

Step 3: Get a Custom Domain Name (Optional but Recommended)

A custom domain looks more professional than a .blogspot.com URL.

How to Buy and Set Up a Custom Domain:

  1. Buy a domain from Google Domains, GoDaddy, or Namecheap.
  2. In Blogger, go to “Settings” > “Publishing” and click “Custom Domain.”
  3. Enter your new domain and follow the setup instructions.
  4. Verify the domain by updating the DNS settings in your domain provider account.

Once set up, your blog will be accessible at YourBusinessName.com, giving it a professional edge.


Step 4: Enable Important Blogger Settings

1. Set Up SEO-Friendly Blog Settings

  • Go to “Settings” > “Meta Tags”, enable “Search Description,” and add a short, keyword-rich description about your business.
  • Under “Crawlers and Indexing,” enable “Custom Robots.txt” and “Custom Meta Tags” for better search engine visibility.

2. Enable HTTPS for Security

  • In “Settings”, scroll to “HTTPS Redirect” and enable it. This ensures your site is secure (SSL-certified), which is important for SEO and trust.

3. Enable Comments Moderation

  • To prevent spam, go to “Settings” > “Comments” and select “Hold for moderation.”

Step 5: Start Creating High-Quality Blog Content

Now that your Blogger page is ready, itโ€™s time to start publishing valuable content.

What Kind of Content Should You Post?

  • How-to guides โ€“ Provide helpful tutorials related to your industry.
  • Industry news โ€“ Share updates and trends.
  • Case studies โ€“ Showcase how your products/services have helped customers.
  • Customer testimonials โ€“ Build trust with real success stories.
  • FAQs โ€“ Answer common customer questions.

How to Write a Blog Post in Blogger

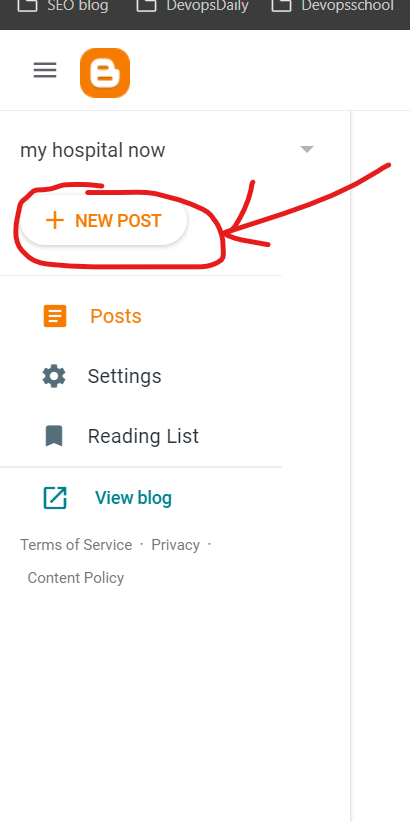
  1. Click on “Posts” in the left menu.
  2. Click “New Post.”
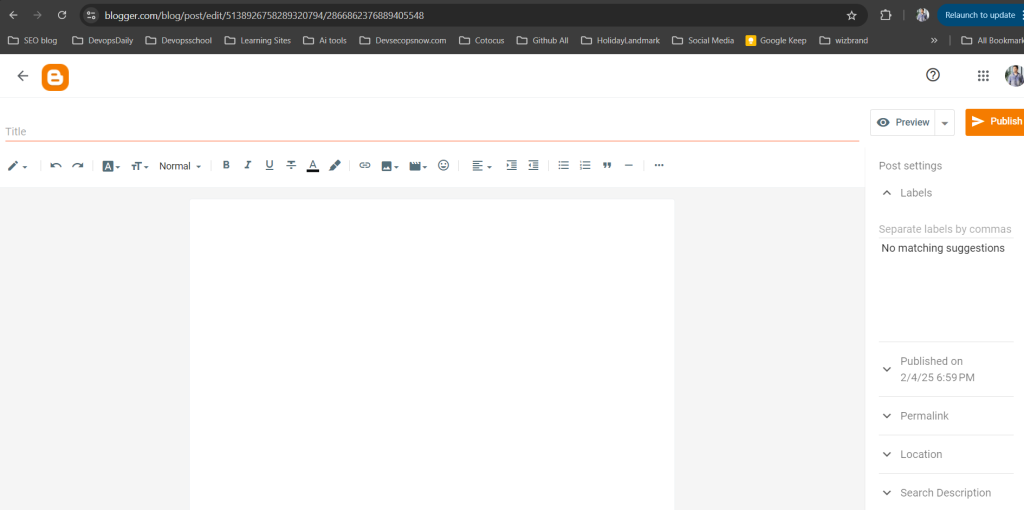
  3. Write your content using the Blogger editor.
  4. Add images, videos, and internal links for better engagement.
  5. Use headings (H1, H2, H3) to structure your content.
  6. Click “Publish.”

Aim to post at least once a week to keep your blog active and engaging.


Step 6: Promote Your Blogger Page and Drive Traffic

1. Share on Social Media

  • Share your blog posts on Facebook, LinkedIn, Twitter, and Instagram.
  • Use Pinterest if you have visual content like infographics.

2. Use Email Marketing

  • Send blog updates to your email subscribers.
  • Add a newsletter signup form to collect leads.

3. Join Online Communities and Forums

  • Participate in Quora, Reddit, and LinkedIn groups to share your blog links when relevant.

4. Optimize for SEO

  • Use relevant keywords in your blog posts.
  • Add alt text to images.
  • Write meta descriptions for each post.
  • Get backlinks from other websites.

5. Run Paid Ads (Optional)

  • Promote blog posts using Google Ads or Facebook Ads for more reach.

Step 7: Monetize Your Blogger Page (Optional)

If your Blogger page gets consistent traffic, you can monetize it using different methods:

  1. Google AdSense โ€“ Display ads and earn money from clicks.
  2. Affiliate Marketing โ€“ Promote products and earn commissions.
  3. Sponsored Posts โ€“ Charge brands to feature their products.
  4. Selling Digital Products โ€“ Offer eBooks, courses, or templates.

To apply for Google AdSense:

  • Go to “Earnings” in Blogger settings.
  • Click “Sign Up for AdSense.”
  • Follow the approval process and start displaying ads.
Post Views: 1,087
Subscribe
Login
Notify of
guest
guest
0 Comments
Oldest
Newest Most Voted
Inline Feedbacks
View all comments
  • Codex vs Claude: A Complete Practical Guide for Modern Developers (2026)
  • Certified AIOps Professional Program A Guide to Career Growth
  • Keycloak Multi-Client Architecture with Project-Based Email Validation (Student, Trainer, Company, Consulting)
  • Incorrect definition of table mysql.column_stats
  • Mautic and PHP 8.3 Compatibility Guide (2026)
  • Certified AIOps Engineer: The Complete Career Path and Certification Guide
  • How to Rename Apache Virtual Host Files Safely (Step-by-Step Guide for Linux)
  • AIOps Foundation Certification: Everything You Need to Know to Get Certified
  • DevOps to Certified Site Reliability Professional: A Senior Mentorโ€™s Guide
  • Certified Site Reliability Manager Training, Preparation, and Career Mapping
  • Certified Site Reliability Architect: The Complete Career Guide
  • What Is a VPN? A Complete Beginner-to-Advanced Tutorial
  • How to Install, Secure, and Tune MySQL 8.4 on Ubuntu 24.04 for Apache Event MPM and PHP-FPM
  • Complete Guide to Certified Site Reliability Engineer Career
  • Certified DevSecOps Professional Step by Step
  • Certified DevSecOps Manager: Complete Career Guide
  • Certified DevSecOps Engineer: Skills, Career Path and Certification Guide
  • Step-by-Step: Become a Certified DevSecOps Architect
  • Tuning PHP 8.3 for Apache Event MPM and PHP-FPM on Ubuntu: A Complete Step-by-Step Production Guide
  • Complete Step-by-Step Guide to Configure Apache Event MPM, Create index.php, Set Up VirtualHost, and Fix Ubuntu Default Page
  • Convert XAMPP Apache to Event MPM + System PHP-FPM
  • The Gateway to System Observability Engineering (MOE)
  • How to Finetune Apache and Prove It Works: A Real-World Guide to Testing Performance, Concurrency, HTTP/2, Memory, CPU, and Security
  • Building a High-Performance Apache Event MPM + PHP-FPM + MariaDB Stack (Advanced Server Optimization Guide)
  • Master Infrastructure as Code: The Complete Hashicorp Terraform Associate Guide
  • Building a High-Performance Apache Server with Event MPM + PHP-FPM (Step-by-Step Guide)
  • Is XAMPP Safer for Production Than Using Apache and PHP as Root? 2026 Practical Guide
  • Unlock Cloud Security Expertise with Certified Kubernetes Security Specialist (CKS)
  • How to Fix wpDiscuz Not Replacing Default WordPress Comments in Block Themes
  • Complete Guide to Certified Kubernetes Application Developer Certification

Recent Comments

  1. digital banking on Complete Tutorial: Setting Up Laravel Telescope Correctly (Windows + XAMPP + Custom Domain)
  2. SAHIL DHINGRA on How to Uninstall Xampp from your machine when it is not visible in Control panel programs & Feature ?
  3. Abhishek on MySQL: List of Comprehensive List of approach to secure MySQL servers.
  4. Kristina on Best practices to followed in .httacess to avoid DDOS attack?
  5. Roshan Jha on Git all Commands

Archives

  • April 2026
  • March 2026
  • February 2026
  • January 2026
  • December 2025
  • November 2025
  • October 2025
  • September 2025
  • August 2025
  • July 2025
  • June 2025
  • May 2025
  • April 2025
  • March 2025
  • February 2025
  • January 2025
  • December 2024
  • November 2024
  • October 2024
  • September 2024
  • August 2024
  • July 2024
  • June 2024
  • May 2024
  • April 2024
  • March 2024
  • February 2024
  • January 2024
  • December 2023
  • November 2023
  • October 2023
  • September 2023
  • August 2023
  • July 2023
  • May 2023
  • April 2023
  • March 2023
  • February 2023
  • January 2023
  • December 2022

Categories

  • Ai
  • AI Blogging
  • AiOps
  • ajax
  • Android Studio
  • Antimalware
  • Antivirus
  • Apache
  • Api
  • API Security
  • Api Testing
  • APK
  • Aws
  • Bike Rental Services
  • ChatGPT
  • Code Linting
  • Composer
  • cPanel
  • Cyber Threat Intelligence
  • Cybersecurity
  • Data Loss Prevention
  • Database
  • dataops
  • Deception Technology
  • DeepSeek
  • Devops
  • DevSecOps
  • DevTools
  • Digital Asset Management
  • Digital Certificates
  • Docker
  • Drupal
  • emulator
  • Encryption Tools
  • Endpoint Security Tools
  • Error
  • facebook
  • Firewalls
  • Flutter
  • git
  • GITHUB
  • Google Antigravity
  • Google play console
  • Google reCAPTCHA
  • Gradle
  • Guest posting
  • health and fitness
  • IDE
  • Identity and Access Management
  • Incident Response
  • Instagram
  • Intrusion Detection and Prevention Systems
  • jobs
  • Joomla
  • Keycloak
  • Laravel
  • Law News
  • Lawyer Discussion
  • Legal Advice
  • Linkedin
  • Linkedin Api
  • Linux
  • Livewire
  • Mautic
  • Medical Tourism
  • MlOps
  • MobaXterm
  • Mobile Device Management
  • Multi-Factor Authentication
  • MySql
  • Network Traffic Analysis tools
  • Paytm
  • Penetration Testing
  • php
  • PHPMyAdmin
  • Pinterest Api
  • Quora
  • SAST
  • SecOps
  • Secure File Transfer Protocol
  • Security Analytics Tools
  • Security Auditing Tools
  • Security Information and Event Management
  • Seo
  • Server Management Tools
  • Single Sign-On
  • Site Reliability Engineering
  • soft 404
  • software
  • SuiteCRM
  • SysOps
  • Threat Model
  • Twitter
  • Twitter Api
  • ubuntu
  • Uncategorized
  • Virtual Host
  • Virtual Private Networks
  • VPNs
  • Vulnerability Assessment Tools
  • Web Application Firewalls
  • Windows Processor
  • Wordpress
  • WSL (Windows Subsystem for Linux)
  • X.com
  • Xampp
  • Youtube
©2026 DevSecOps Now!!! | WordPress Theme: EcoCoded
wpDiscuz