Limited Time Offer!
For Less Than the Cost of a Starbucks Coffee, Access All DevOpsSchool Videos on YouTube Unlimitedly.
Master DevOps, SRE, DevSecOps Skills!
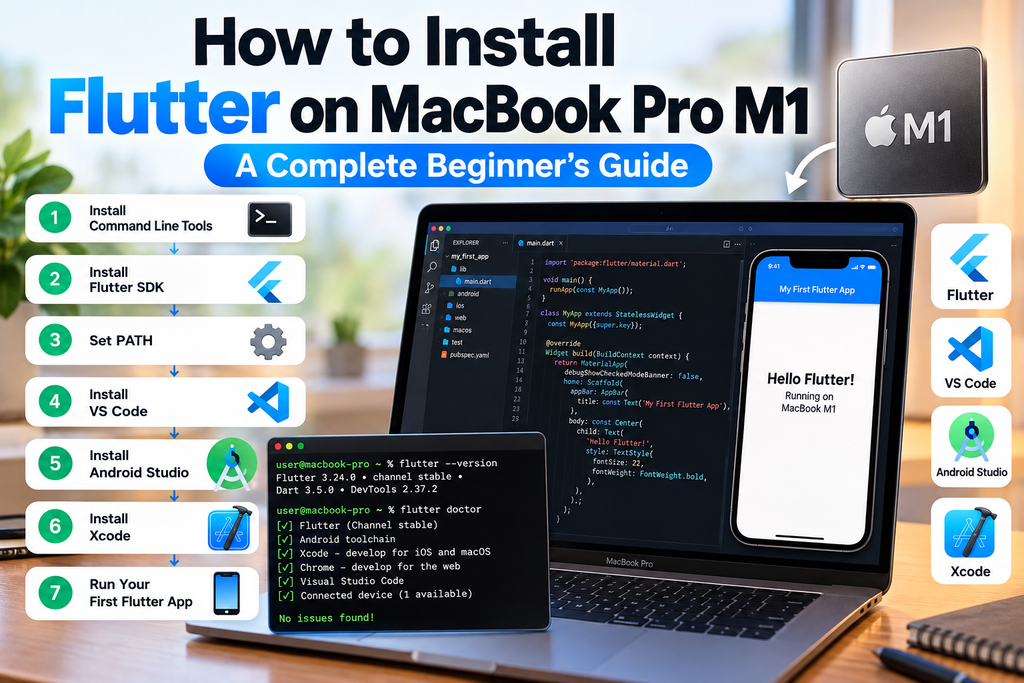
If you’ve recently started exploring Flutter development and own a MacBook Pro with Apple’s M1 chip, you’re already working with a capable machine for building mobile applications.
The good news is that Flutter supports Apple Silicon, so you don’t need a separate Intel-based computer or a complicated workaround to get started.
However, installing Flutter involves a little more than downloading a single application. You need to set up the Flutter SDK, configure your Mac’s environment, and install additional tools depending on whether you want to build Android apps, iOS apps, or both.
In this tutorial, we’ll go through the installation process from the beginning. We’ll also cover the errors you might encounter and create a simple Flutter application to confirm that everything is working.
By the end, your MacBook Pro M1 should be ready for Flutter development.
What Is Flutter, and Why Use It on a MacBook M1?
Flutter is an open-source development framework created by Google. It allows developers to build applications for Android, iOS, web, and desktop platforms using a single codebase.
Flutter applications are written in Dart, a programming language also developed by Google.
One reason developers choose Flutter is that they can share much of their application code across different platforms instead of maintaining completely separate Android and iOS projects.
If you use a MacBook with an M1 processor, you also have the advantage of being able to develop and test both Android and iOS applications on the same machine.
You can use Android Studio to run Android emulators and Xcode to run Apple’s iOS Simulator.
What Do You Need Before Installing Flutter?
Before opening Terminal, make sure your Mac is ready.
You’ll need:
- A MacBook Pro, MacBook Air, Mac mini, or another Mac with an Apple Silicon chip such as M1, M2, M3, or M4.
- A macOS version supported by the current Flutter SDK and the version of Xcode you intend to install.
- A stable internet connection.
- Enough available storage for development tools, SDKs, and simulators.
- An editor such as Visual Studio Code.
- Android Studio if you plan to develop Android applications.
- Xcode if you want to develop iOS or native macOS applications.
You don’t have to install everything at once. For example, if your immediate goal is Flutter web development, you can start with Flutter, VS Code, and a supported browser.
Android Studio and Xcode can be configured when you need their respective platforms.
Step 1: Check Whether Your Mac Uses Apple Silicon
Before downloading development software, it’s worth confirming your Mac’s processor architecture.
Click the Apple logo in the top-left corner of your screen and choose About This Mac.
You should see your chip listed as Apple M1.
There’s another quick way to check through Terminal.
Open Terminal using Spotlight Search (Command + Space), type Terminal, and press Enter.
Run:
uname -m
On an M1 Mac running a native Terminal session, the expected result is:
arm64
This is important because some development tools offer separate downloads for Intel and Apple Silicon Macs.
Whenever an application provides both versions, choose the Apple Silicon or ARM64 version unless the software specifically requires something else.
Step 2: Install Xcode Command Line Tools
The first thing we’ll install is Apple’s Command Line Tools package.
It provides several developer utilities, including Git, which we’ll use to download Flutter.
Open Terminal and enter:
xcode-select --install
A macOS installation dialog should appear if the tools aren’t already installed.
Click Install and follow the instructions.
If macOS tells you the tools are already installed, you can move on.
After installation, check whether Git is available:
git --version
Terminal should display a Git version number.
That’s all we need from Git for now.
You don’t need to install the complete Xcode application at this stage unless you’re preparing for iOS or macOS development.
Step 3: Download and Install the Flutter SDK
Now we’re ready to install Flutter itself.
There are several ways to download Flutter, but using Git gives you a straightforward installation that is easy to manage through Terminal.
First, create a dedicated folder for development tools:
mkdir -p ~/development
Move into that folder:
cd ~/development
Next, download the stable Flutter SDK:
git clone https://github.com/flutter/flutter.git -b stable
Git will download the Flutter repository into a folder named flutter.
The download size and completion time depend on your internet connection.
Once the command finishes, your folder structure should look something like this:
/Users/yourusername/development/flutter
Here, yourusername represents your macOS account name.
You can verify that the directory exists by running:
ls ~/development/flutter
You should see several Flutter SDK files and folders.
A small but useful tip: Keep the Flutter SDK inside your home directory rather than moving it into a protected macOS system folder.
This makes future upgrades easier and avoids unnecessary permission problems.
Step 4: Add Flutter to the macOS PATH
Downloading Flutter isn’t quite the same as making it available everywhere on your Mac.
Right now, Terminal needs to know where Flutter is installed.
That’s where the PATH environment variable comes in.
Think of PATH as a list of directories that Terminal checks when you enter a command.
We want Terminal to recognize commands such as flutter and dart without requiring their full file paths.
Most modern macOS installations use Zsh as the default shell.
Check yours:
echo $SHELL
If the result ends in /zsh, continue with the following instructions.
Open your Zsh profile:
nano ~/.zprofile
Add this line at the bottom of the file:
export PATH="$HOME/development/flutter/bin:$PATH"
Save the changes by pressing Control + O, followed by Enter.
Then press Control + X to exit Nano.
Reload the profile:
source ~/.zprofile
Now check Flutter:
flutter --version
If Flutter is correctly installed and the PATH is configured, Terminal will display the installed Flutter SDK version and related information.
You can also check Dart:
dart --version
There’s no need to download Dart separately because the Flutter SDK already includes it.
If Terminal still says command not found, close Terminal, open it again, and check the PATH configuration.
Step 5: Check Your Flutter Installation with Flutter Doctor
Flutter includes a diagnostic tool called Flutter Doctor.
It checks the development environment and tells you which tools are installed, which ones need attention, and what is missing.
Run:
flutter doctor -v
The -v option shows more detailed information.
Depending on your setup, Flutter Doctor may check:
- Flutter SDK installation
- Android development tools
- Xcode installation
- Supported web browsers
- Visual Studio Code
- Connected devices
- Network resources
Don’t worry if you see warnings for Android Studio or Xcode at this stage.
For example, if you haven’t installed Android Studio yet, Flutter Doctor may flag the Android toolchain as incomplete.
That doesn’t automatically mean your Flutter installation failed.
It simply means Android development hasn’t been fully configured.
The important thing is to resolve issues affecting the platforms you actually want to develop for.
Step 6: Install Visual Studio Code for Flutter Development
You can write Flutter applications in several editors, but Visual Studio Code is a practical choice, especially if you’re already comfortable with it.
It’s lightweight compared with a full IDE and provides features such as debugging, syntax highlighting, code completion, and integrated Terminal access.
Download VS Code from:
Choose the Apple Silicon version if the website gives you an architecture choice.
Install and open VS Code.
Next, install its Flutter extension.
Press:
Command + Shift + X
This opens the Extensions panel.
Search for Flutter.
Install the extension published by Dart Code.
The Dart extension will normally be installed as a dependency.
Once the extensions are installed, restart VS Code if necessary.
To check your setup, open the Command Palette using:
Command + Shift + P
Type:
Flutter: New Project
If VS Code recognizes the Flutter SDK, you’re ready to create applications.
If VS Code asks you to locate the SDK, point it to:
~/development/flutter
You can also install the Flutter extension from Terminal if the VS Code code command is available:
code --install-extension Dart-Code.flutter
An Alternative: Install Flutter Directly Through VS Code
If you haven’t already installed Flutter manually, VS Code can download the SDK for you.
Open the Command Palette, select Flutter: New Project, and choose Download SDK when prompted.
Select a suitable installation directory and click Clone Flutter.
When VS Code offers to add Flutter to PATH, accept that option.
Choose one installation method rather than installing multiple Flutter SDK copies unnecessarily.
Since we’ve already installed the SDK manually in this tutorial, there’s no need to download it again.
Step 7: Install Android Studio for Android Development
If you want to build Flutter apps for Android phones, you’ll need the Android SDK and its development tools.
Android Studio makes installing and managing those tools much easier.
Visit:
Download the version compatible with Mac computers using Apple chips.
Install Android Studio and launch it.
During initial setup, Android Studio should guide you through installing the necessary components.
Once the application opens, navigate to Tools → SDK Manager.
Under the SDK Platforms tab, make sure a current Android SDK platform supported by your tools is installed.
Next, open the SDK Tools tab.
Check that the required tools are installed, including:
- Android SDK Build-Tools
- Android SDK Command-line Tools
- Android SDK Platform-Tools
- Android Emulator
Other components, such as the Android NDK and CMake, may also be needed depending on your project.
Apply any required changes and complete the installation.
Accept Android SDK Licenses
After installing the Android SDK, return to Terminal and run:
flutter doctor --android-licenses
You’ll be asked to review the Android SDK license agreements.
Read the agreements and accept the necessary licenses.
Once complete, run:
flutter doctor
Flutter should now be able to check your Android development environment more completely.
Create an Android Emulator on Your M1 Mac
An emulator lets you test Android applications without connecting a physical phone.
Open Android Studio and navigate to:
Tools → Device Manager
Click the option to create a virtual device.
Choose a phone profile, such as a Pixel model, and proceed to the system image selection.
Because your Mac has an M1 processor, select an ARM64-compatible system image where that architecture option is provided.
Download the required image and finish the setup.
You’ll now have a virtual Android device that can be started from Android Studio.
Click its Run button.
Once the emulator is running, open Terminal and enter:
flutter devices
If everything is configured correctly, Flutter should list the emulator among your available devices.
Step 8: Install Xcode for iOS Development
One of the main advantages of developing with Flutter on a Mac is that you can build iPhone applications.
For that, you’ll need Xcode.
Open the Mac App Store, search for Xcode, and install a version compatible with your macOS release.
Xcode is a large application, so make sure you have sufficient free storage before installing it.
After installation, open Terminal.
Tell macOS to use the installed Xcode developer directory:
sudo xcode-select -s /Applications/Xcode.app/Contents/Developer
Run Xcode’s first-launch setup:
sudo xcodebuild -runFirstLaunch
Then review the Xcode license:
sudo xcodebuild -license
You may need to enter your Mac login password when using sudo.
Next, download iOS platform support and simulator components:
xcodebuild -downloadPlatform iOS
You can also manage simulator runtimes from within Xcode.
Open the iOS Simulator
The simulator gives you a virtual iPhone on your Mac.
On Xcode 26 or earlier, you can normally launch it with:
open -a Simulator
For Xcode 27 and later, Apple’s simulator interface is available through Device Hub:
open -a DeviceHub
Once it opens, select an available iPhone simulator.
Check whether Flutter can detect it:
flutter devices
If Flutter recognizes the simulator, your development environment is ready for iOS testing.
Keep in mind that testing on a physical iPhone also involves Apple’s device trust, Developer Mode, and code-signing setup.
Do You Need CocoaPods?
Some Flutter projects and plugins use native iOS or macOS dependencies.
Modern Flutter versions support Swift Package Manager, while projects using CocoaPods may still require CocoaPods to be installed.
If your project needs CocoaPods and you have Homebrew installed, you can run:
brew install cocoapods
Then verify it:
pod --version
You don’t need to install CocoaPods purely for Android or Flutter web development.
Step 9: Create Your First Flutter Project
With the SDK and development tools in place, let’s create a small application.
Open Terminal and move into your development directory:
cd ~/development
Create a Flutter application:
flutter create my_first_app
Flutter will generate the project files and default example application.
Move into the new directory:
cd my_first_app
If you want to open the project in VS Code, run:
code .
This command assumes you’ve enabled VS Code’s code command in your shell.
Otherwise, open VS Code manually and select the project folder.
Understand the Flutter Project Structure
When you open a Flutter project for the first time, you’ll notice several folders.
Here’s what the important ones do:
| Folder or File | Purpose |
|---|---|
lib/ | Contains your Dart application code |
lib/main.dart | Main entry point of the application |
android/ | Android platform configuration |
ios/ | iOS platform configuration |
web/ | Web application files |
macos/ | macOS desktop application files |
test/ | Automated test files |
pubspec.yaml | Project settings, dependencies, and assets |
For most new Flutter projects, you’ll initially spend much of your development time inside the lib directory.
The main.dart file is a good place to begin learning Flutter.
Step 10: Run Your First Flutter Application
Before launching the application, check which devices Flutter can access.
Run:
flutter devices
You’ll see the development targets currently available on your machine.
Run Flutter in Google Chrome
If Chrome is installed and Flutter detects it, run:
flutter run -d chrome
Flutter will compile your application for the web and open it in Chrome.
This is a convenient way to get started without configuring a mobile emulator.
Run Flutter on macOS
To run the application as a native macOS desktop app, use:
flutter run -d macos
This requires the macOS development toolchain to be properly configured.
Run Flutter on an Android Emulator
Start your Android emulator in Android Studio.
Then run:
flutter run
If more than one development device is connected, Flutter may ask you to select a target or provide a device ID.
You can get the available device IDs using:
flutter devices
Then run the application on a specific device:
flutter run -d DEVICE_ID
Replace DEVICE_ID with the actual device ID shown by Flutter.
Run Flutter on an iPhone Simulator
Open an available iPhone simulator through Xcode’s simulator tools or Device Hub.
Run:
flutter devices
Once your simulator appears, start the app using its device ID:
flutter run -d DEVICE_ID
The first build may require additional downloads and native compilation. Later builds often benefit from cached dependencies.
Step 11: Make a Small Change to Your First Flutter App
Now that your first application is running, try changing something on the screen.
Open:
lib/main.dart
Replace the existing Dart code with this simple example:
import 'package:flutter/material.dart';

void main() {
  runApp(const MyApp());
}

class MyApp extends StatelessWidget {
  const MyApp({super.key});

  @override
  Widget build(BuildContext context) {
    return MaterialApp(
      debugShowCheckedModeBanner: false,
      home: Scaffold(
        appBar: AppBar(
          title: const Text('My First Flutter App'),
          backgroundColor: Colors.blue,
        ),
        body: const Center(
          child: Text(
            'Hello Flutter! Running on MacBook M1',
            style: TextStyle(
              fontSize: 22,
              fontWeight: FontWeight.bold,
            ),
            textAlign: TextAlign.center,
          ),
        ),
      ),
    );
  }
}
Save the file.
If your application is already running in a Flutter debug session, trigger hot reload. In a supported Terminal session, press r.
You should see the updated message in the application.
That’s one of Flutter’s most convenient development features. You can make many UI changes and see them reflected without restarting the entire application.
Not every change can be handled by hot reload, particularly changes involving application initialization or native platform code. For those cases, you may need to perform a hot restart or rebuild.
Step 12: Fix Common Flutter Installation Problems on Mac M1
Even after following the installation steps carefully, you might encounter a warning or two.
Here are some common issues and what to check.
Problem 1: flutter: command not found
This generally means the Flutter executable isn’t available through your Terminal PATH.
First, confirm the SDK exists:
ls ~/development/flutter/bin
Then check your shell configuration:
cat ~/.zprofile
Make sure it contains:
export PATH="$HOME/development/flutter/bin:$PATH"
Reload the profile:
source ~/.zprofile
Try again:
flutter --version
If Flutter is installed in a different directory, update the PATH to match its actual location.
Problem 2: Android Licenses Are Not Accepted
Flutter Doctor may report that the Android license status is unknown or that licenses haven’t been accepted.
Run:
flutter doctor --android-licenses
If the command fails because SDK Command-line Tools are missing, open Android Studio’s SDK Manager and install the latest compatible Android SDK Command-line Tools package.
Then repeat the license command.
Problem 3: Android Emulator Is Not Showing Up
First, make sure your virtual device is actually running.
Check the available emulators:
flutter emulators
Then check connected devices:
flutter devices
If the emulator isn’t available, reopen Android Studio’s Device Manager, verify the virtual device configuration, and start it again.
Also check that you selected an ARM-compatible system image for your Apple Silicon Mac.
Problem 4: Xcode Installation Is Incomplete
Sometimes Xcode is installed but Flutter Doctor still shows a warning.
Run:
sudo xcode-select -s /Applications/Xcode.app/Contents/Developer
Then:
sudo xcodebuild -runFirstLaunch
If required, complete the Xcode license acceptance and install the missing simulator platform components.
Finally, recheck:
flutter doctor -v
Problem 5: CocoaPods Is Missing
If your iOS or macOS project uses CocoaPods and Flutter reports that it’s unavailable, install CocoaPods using a supported installation method.
For Homebrew users:
brew install cocoapods
Verify the installation:
pod --version
If you’re using a newer Flutter project that relies on Swift Package Manager, check whether CocoaPods is actually required before installing another dependency manager.
Problem 6: An Older Tool Requires Rosetta 2
Flutter supports Apple Silicon, but some older third-party tools may still use Intel-only binaries.
If a required component specifically needs Rosetta, you can install it using:
softwareupdate --install-rosetta
Follow the installation and license prompts.
You generally shouldn’t need Rosetta just to use the Apple Silicon Flutter SDK.
Step 13: Keep Flutter Updated
Installing Flutter is only the beginning. As the framework evolves, new stable releases introduce bug fixes, compatibility updates, and development improvements.
Check your current version:
flutter --version
To update Flutter on its current release channel, run:
flutter upgrade
For a particular project, you can download and resolve its Dart package dependencies using:
flutter pub get
And whenever you encounter an environment-related problem, Flutter Doctor is a sensible first check:
flutter doctor -v
Before upgrading an existing production project, review package compatibility and test the application rather than assuming every dependency will work unchanged.
Frequently Asked Questions
Can I install Flutter on a MacBook Pro M1?
Yes. Flutter supports Apple Silicon Macs, including the MacBook Pro M1. Make sure you download compatible versions of Flutter and its supporting development tools.
Is Flutter free to use?
Yes. Flutter is an open-source framework, and you can use the Flutter SDK without paying for a license.
Some related services, such as paid developer programs or third-party platforms, may have their own costs.
Can I develop both Android and iOS apps on my M1 MacBook?
Yes. Your Mac can support both workflows.
For Android development, install and configure the Android SDK and an emulator or physical device.
For iOS development, install Xcode and configure the necessary simulator or device-signing tools.
Do I need Android Studio if I already use VS Code?
You don’t need Android Studio as your code editor.
However, Android Studio is a convenient way to install and manage the Android SDK, Android emulators, and related tools.
You can continue writing your Flutter application code in VS Code.
Do I need to install Dart separately?
No. Dart is included with the Flutter SDK.
After installing Flutter, you can check Dart by running dart --version.
Can I use Flutter without Xcode?
Yes, if you’re developing for supported targets that don’t require Xcode, such as Flutter web or Android.
To compile Flutter applications for iOS or native macOS, you’ll need the appropriate Apple development tools.
Is a MacBook M1 good for Flutter development?
An M1 MacBook is a practical option for Flutter development. Apple Silicon support allows you to run compatible Flutter development tools directly on the ARM64 architecture.
Your actual experience will depend on the machine’s memory, available disk space, the number of emulators running, and the complexity of your project.
Final Thoughts
Setting up Flutter on a MacBook Pro M1 might seem a little involved when you first look at the list of required tools. But the process becomes much easier once you understand which component does what.
Flutter provides the framework and Dart development tools. VS Code gives you a place to write and debug your application. Android Studio handles Android SDKs and emulators, while Xcode takes care of Apple’s development environment.
The best way to confirm your installation is to create a small project, run it on your chosen platform, and make a visible change using hot reload.
Once that works, you have a development environment you can start using for real applications.
From here, you can move on to learning Flutter widgets, layouts, navigation, state management, API integration, and application deployment.
Happy coding!
Suggested SEO Details
SEO Title: How to Install Flutter on MacBook Pro M1 – Complete Guide (2026)
Meta Description: Learn how to install Flutter on MacBook Pro M1 step by step. Set up Flutter SDK, PATH, VS Code, Android Studio, Xcode, and run your first app.
Suggested URL Slug: install-flutter-macbook-pro-m1
Primary Keyword: install Flutter on MacBook Pro M1
Related Keywords: Flutter setup on Mac M1, Flutter installation macOS, Apple Silicon Flutter, Flutter SDK Mac, Flutter with VS Code, Flutter Android Studio setup, Flutter iOS development
Suggested original screenshots to add: Flutter version in Terminal, Flutter Doctor results, VS Code Flutter extension, Android Studio SDK Manager, and the first app running on your Mac or emulator.