Limited Time Offer!
For Less Than the Cost of a Starbucks Coffee, Access All DevOpsSchool Videos on YouTube Unlimitedly.
Master DevOps, SRE, DevSecOps Skills!

Depending on the type of problem, there are several commands and procedures required for troubleshooting MySQL. This is a thorough troubleshooting guide for MySQL that covers typical failures, installation issues, connection issues, and performance modification.
One popular relational database management system (RDBMS) that is well-known for its dependability and efficiency is MySQL. Users might run across a number of problems, though, that could prevent it from working properly. This manual offers a comprehensive method for troubleshooting MySQL, including common errors, installation concerns, connectivity problems, and performance enhancements.
Checking MySQL Service Status
Step 1:- First, check if the MySQL service is running
sudo systemctl status mysqlStep 2:- If it’s not running, start it:
sudo systemctl start mysqlStep 3:- Enable MySQL to start on boot:
sudo systemctl enable mysqlChecking MySQL Error Log
Look through the MySQL error log for any hints.
sudo tail -f /var/log/mysql/error.logConnecting to MySQL
Test connecting to MySQL from the command line:
mysql -u root -pWhen you have connection problems with MySQL, the configuration file is one of the first places to go. The configuration file (/etc/mysql/my.cnf or /etc/my.cnf depending on your system) includes settings that control how the MySQL server functions, such as network and authentication parameters. Here’s an in-depth look at how to resolve these settings.
Bind-Address Settings:-The bind-address directive defines the IP address MySQL listens to for incoming connections. Misconfigurations here may prohibit clients from connecting to the server.
Symptoms: Clients cannot connect to the MySQL server, especially from remote hosts.
Steps to Check and Correct:
- Step 1: – Locate the Configuration File:
- Common locations are
/etc/mysql/my.cnfor/etc/my.cnf. - Open the file in a text editor (e.g.,
sudo nano /etc/mysql/my.cnf).
- Common locations are
- Step 2: – Find the Bind-Address Setting:
[mysqld]
bind-address = 127.0.0.1- Step 3:- Adjust the Bind-Address:
- Local Connections Only: If set to 127.0.0.1, MySQL will only accept connections from your local system.
- distant Connections: To allow distant connections, use the server’s IP address or 0.0.0.0 to listen on all interfaces.
bind-address = 0.0.0.0- Step 4:- Restart MySQL:
- Apply the changes by restarting the MySQL service.
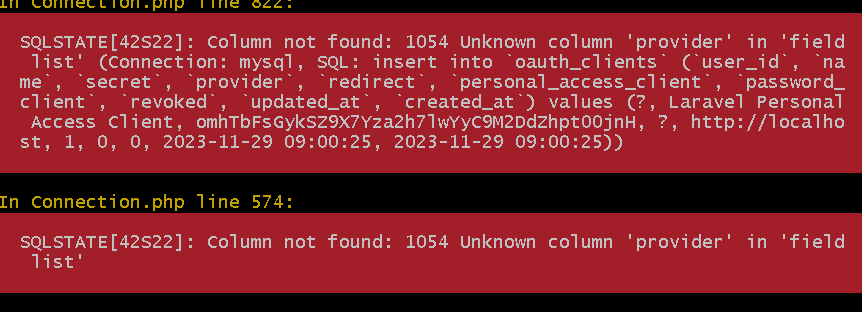
sudo systemctl restart mysqlAuthentication Issues:- Authentication difficulties occur when user credentials or host permissions are incorrectly set.
Symptoms: “Access denied” errors when trying to connect.
Steps to Check and Correct:
- Step 1:- Locate the Configuration File:
- Same as above, open
/etc/mysql/my.cnfor/etc/my.cnf.
- Same as above, open
- Step 2:- Check User Privileges:
- Log into MySQL as root or an administrative user.
mysql -u root -p
- List users and their hosts:
SELECT user, host FROM mysql.user;
- Ensure that the user you’re attempting to connect with has the necessary host permissions. For distant connections, use % or the exact IP address as the
host.
- Log into MySQL as root or an administrative user.
- Step 3:- Grant Necessary Privileges:
- If the user does not have the necessary privileges, grant them:
GRANT ALL PRIVILEGES ON *.* TO 'username'@'%' IDENTIFIED BY 'password';
FLUSH PRIVILEGES;- Step 4:- Verify Passwords:
- Ensure the password for the user is correct. Reset it if necessary:
ALTER USER 'username'@'%' IDENTIFIED BY 'new_password';- Step 5:- Ensure Correct Plugin is Used:
- Sometimes the authentication plugin can cause issues. Check the plugin for the user:
SELECT user, host, plugin FROM mysql.user;
- If needed, change the plugin (e.g., to
mysql_native_password):- ALTER USER ‘username’@’%’ IDENTIFIED WITH mysql_native_password BY ‘new_password’;
- Sometimes the authentication plugin can cause issues. Check the plugin for the user:
Verifying MySQL User Privileges
Ensure the user has the correct privileges:
SHOW GRANTS FOR 'username'@'hostname';

================
To grant privileges:
================
GRANT ALL PRIVILEGES ON database.* TO 'username'@'hostname';
FLUSH PRIVILEGES;
Checking Network Issues
If you are having connection issues remotely, check the firewall settings:
- sudo ufw status
=========================
Allow MySQL through the firewall if necessary:
=========================
- sudo ufw allow mysql
Checking MySQL Performance
Monitor MySQL performance using built-in tools:
- SHOW PROCESSLIST;
Lists all active connections and their current state.
- SHOW STATUS LIKE 'Threads%';
Displays thread-related status variables.
- SHOW VARIABLES LIKE 'max_connections';
Shows the current setting for the maximum number of connections.
- SHOW VARIABLES LIKE 'innodb_buffer_pool_size';
Displays the current size of the InnoDB buffer pool.
Explanation:
Monitoring these metrics helps in understanding the server load, potential bottlenecks, and whether certain configuration parameters need adjustment.
Optimizing MySQL Performance
Adjust MySQL performance settings in /etc/mysql/my.cnf:
[mysqld]
innodb_buffer_pool_size = 1G
query_cache_size = 64M
thread_cache_size = 8
max_connections = 500
Explanation:
innodb_buffer_pool_size: Determines the amount of memory allocated to the InnoDB buffer pool. A larger buffer pool can improve performance for read-heavy workloads.query_cache_size: Configures the size of the query cache. The query cache can speed up the retrieval of frequently executed queries.thread_cache_size: Sets the number of threads that the server should cache for reuse. Caching threads can reduce overhead from thread creation.max_connections: Sets the maximum number of concurrent connections.
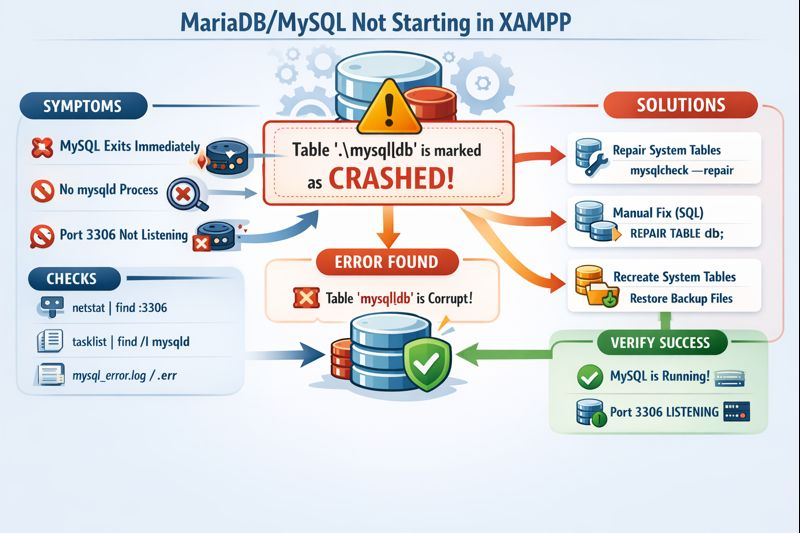
Repairing MySQL Tables
If you suspect table corruption, repair the tables:
REPAIR TABLE tablename;Explanation:
Table corruption can occur due to various reasons, such as crashes or hardware failures. The REPAIR TABLE command attempts to fix such issues.
Checking Table Status
Check the status of tables:
SHOW TABLE STATUS LIKE 'tablename';- Provides information about the specified table, including its engine, row format, and data length.
Explanation:
- Understanding table status helps in diagnosing issues related to storage engines, table size, and potential corruption.
Backing Up and Restoring Data
Ensure you have backups:
mysqldump -u root -p database_name > backup.sqlRestore from a backup:
mysql -u root -p database_name < backup.sqlExplanation:
Regular backups are essential for data safety. mysqldump is a versatile tool for creating logical backups of MySQL databases.
Upgrading MySQL
To ensure you have the latest features, security updates, and bug fixes.
sudo apt-get update
sudo apt-get upgrade mysql-server
Updates the package list and upgrades MySQL to the latest version.
Explanation:
Keeping MySQL up-to-date ensures you have the latest improvements and security patches, which can prevent many issues.
Conclusion
Understanding and applying these precise methods allows you to properly debug and improve MySQL. Regular monitoring, correct configuration, and timely maintenance are required for a reliable and efficient MySQL system.

Nice explanation
Very helpful blog for MYSQL Troubleshooting.