Limited Time Offer!
For Less Than the Cost of a Starbucks Coffee, Access All DevOpsSchool Videos on YouTube Unlimitedly.
Master DevOps, SRE, DevSecOps Skills!
Make sure PHP and Composer are installed on your local workstation before starting your first Laravel project. Laravel Herd can quickly install PHP and Composer if you’re coding on macOS. Furthermore, we advise installing NPM and Node.
Installation:
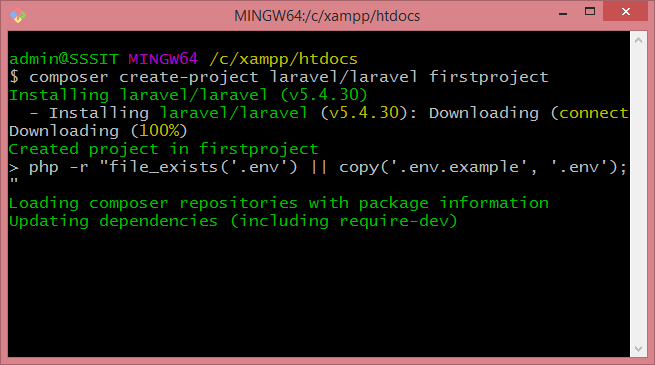
Using Composer’s create-project command, you may start a new Laravel project once PHP and Composer have been installed:
composer create-project --prefer-dist laravel/laravel firstproject
Database Setup:
A.env file for configuration and credentials is automatically created during the installation process of a new Laravel project. This file is cloned from the.env.example file. You may need to adjust the following block of parameters to fit your database configuration, depending on how you have it set up:
DB_CONNECTION=mysql
DB_HOST=127.0.0.1
DB_PORT=3306
DB_DATABASE=laravel
DB_USERNAME=root
DB_PASSWORD=
Perhaps make a new database just for this project
You would then want to adjust the database configuration in .env.
DB_CONNECTION=mysql
DB_HOST=127.0.0.1
DB_PORT=3306
DB_DATABASE=test_database
DB_USERNAME=root
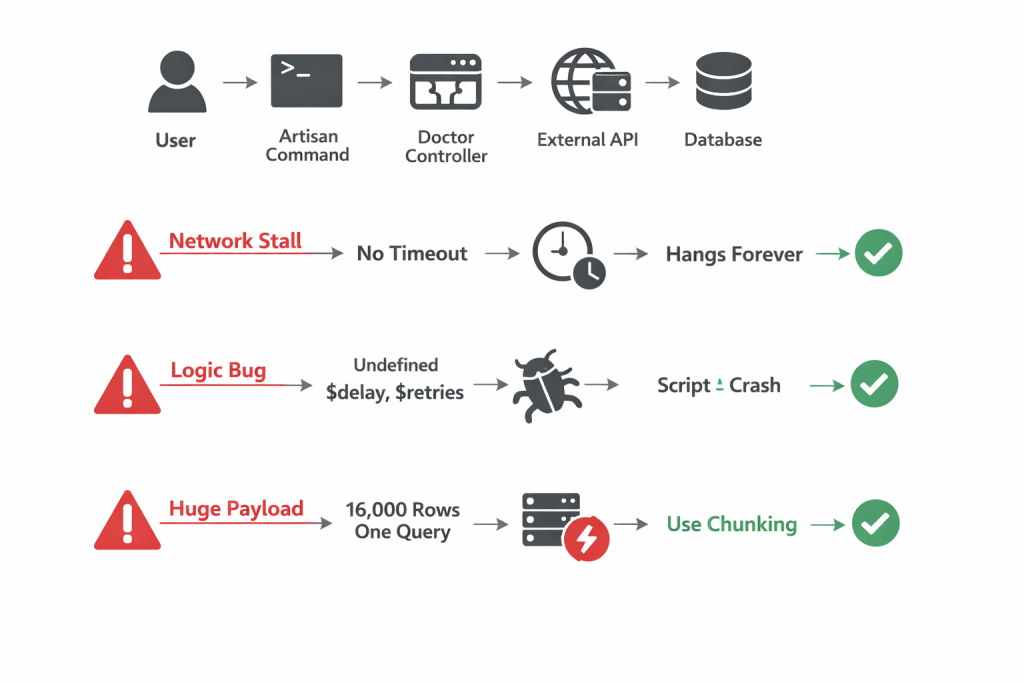
DB_PASSWORD=The migrate artisan command is the most effective method for testing your database connection.
php artisan migrateAfter using the migrate command, if everything went as planned, you ought to see something similar like this.

Authentication Scaffolding:
Creating shared scaffolding with a distinct first-party package from Laravel makes authentication setup simple. We must install the UI composer package before we can utilize it:
composer require laravel/ui
A few commands for configuring scaffolding for React, Vue, and Bootstrap are included in the UI package. For this project, we’ll build a basic auth scaffolding; however, you are welcome to follow the frontend setup instructions.
Routing and Views:
We must design a new route that will display our submission form and change the main project route in order to construct a view displaying the list of connections. Within the routes/web.php file, we may add additional routes to our application.
The default path is shown below in the web routes file:
Route::get('/', function () {
    return view('welcome');
});
We have two options when creating a new route: a specialized controller class or a route closure. We will utilize closures for our index and submission routes in this tutorial.
Controllers :
A Laravel framework would not be complete without Laravel controllers. Previously, we handled the request logic using closures in route files; currently, we utilize controller classes in lieu of closures in route files. The “app/http/Controllers” directory contains definitions for the controllers, which are used to manage the request logic inside the single class. The MVC (Model View Controller) architecture, which the Laravel framework adheres to, uses controllers to transfer data back and forth between models and views.
Let’s look at how to use the Git Bash Window to generate the controller.
php artisan make:controller YourController