Limited Time Offer!
For Less Than the Cost of a Starbucks Coffee, Access All DevOpsSchool Videos on YouTube Unlimitedly.
Master DevOps, SRE, DevSecOps Skills!
Forgetting a Windows 11 password is more common than people realize, especially when a laptop has not been used for several months. Many users immediately assume they need to reinstall Windows or visit a service center, but in reality, Windows provides recovery mechanisms that allow access to the system without deleting personal files.
This guide explains exactly how to reset or bypass a forgotten Windows 11 password, focusing on local accounts, using the Windows Recovery Environment.
It also addresses common errors, including issues like missing files, incorrect drive letters, and recovery-mode limitations—problems you personally encountered during the process.
This tutorial is intended for:
- Personal laptop owners
- Users locked out of their own Windows 11 systems
- Anyone who wants a safe, data-preserving method
Important Disclaimer (Read Before Proceeding)
This guide is intended only for devices you own or are authorized to access.
Using these steps on unauthorized systems is illegal and unethical.
This method:
- Does not delete files
- Does not format the disk
- Does not require third-party tools
- Temporarily modifies a Windows system file, which will be restored later
Understanding the Problem: Why You Are Locked Out
There are two types of Windows 11 accounts:
Microsoft Account
- Login uses an email address
- Password can be reset online
- Requires internet access
Local Account (This Guide Applies Here)
- Login uses only a username
- No online password reset
- Requires offline recovery steps
If your login screen does not show an email address, you are using a local account, which is why standard password reset options do not work.
⚠️ IMPORTANT (Please Read First)
- Use this only on your own laptop
- This is a temporary change (we’ll restore it later)
- Files, documents, photos → SAFE
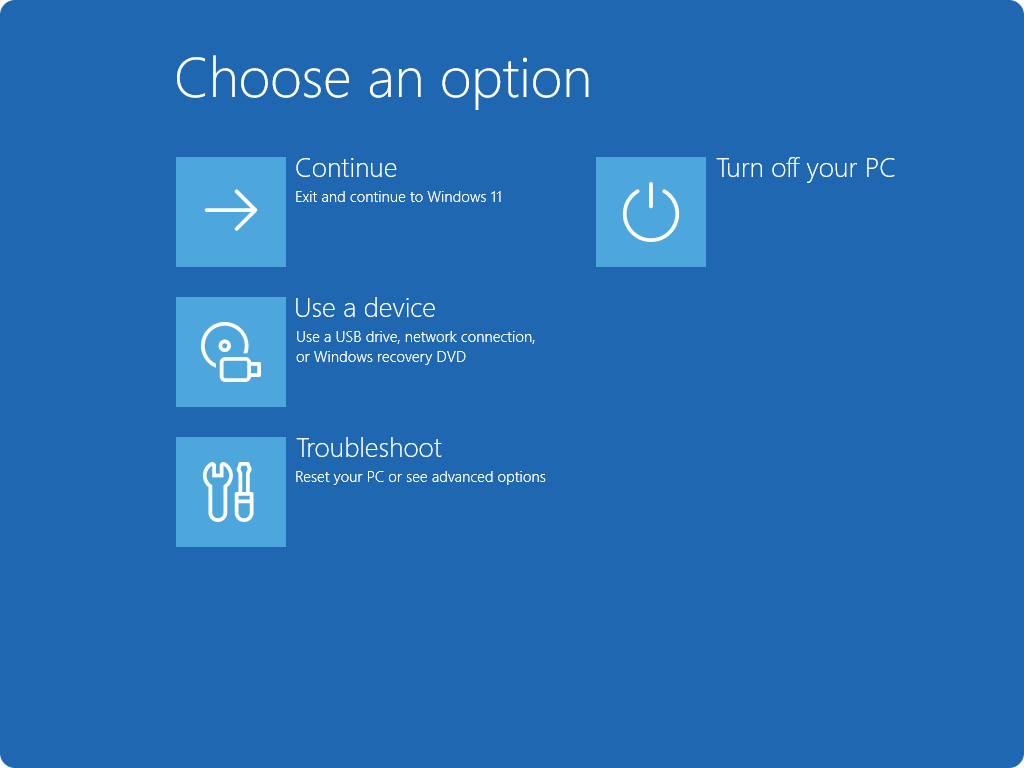
🧭 STEP 1: Enter Windows Recovery Mode
Do this:
- Turn ON your laptop
- When Windows logo appears → press & hold Power button to turn it OFF
- Repeat this 3 times
- On the 4th boot, you’ll see
“Preparing Automatic Repair”
Then:
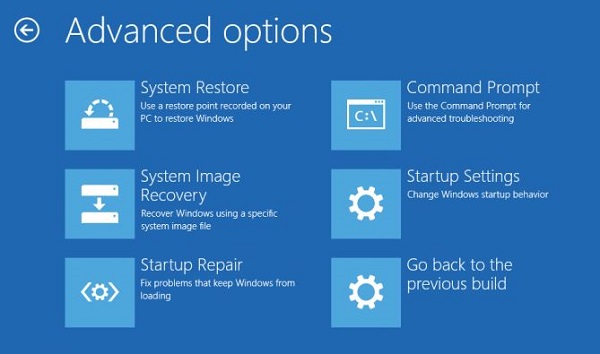
➡️ Advanced options
➡️ Troubleshoot
➡️ Advanced options
➡️ Command Prompt
🧭 STEP 2: Find Your Windows Drive Letter
In Recovery Mode, Windows drive is not always C:.
Type this and press Enter:
diskpart
Then:
list volume
Look for the volume that:
- Has Windows
- Size looks large (50GB+)
- Note its letter (example:
D)
Exit diskpart:
exit
👉 I’ll assume it is D:
(Replace D: with your actual letter if different)
🧭 STEP 3: Replace Utility Manager with Command Prompt
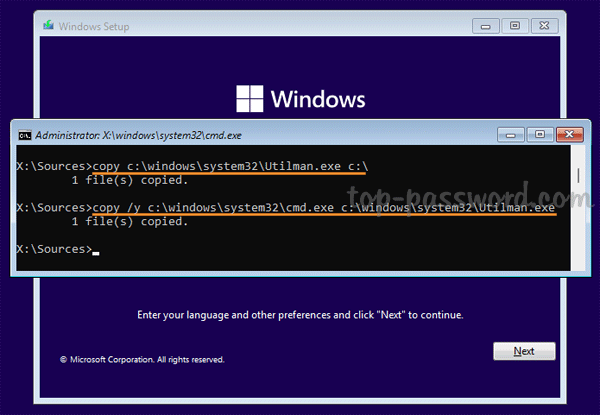
Now type these commands ONE BY ONE:
D:
cd Windows\System32
Backup Utility Manager
ren utilman.exe utilman.exe.bak
Replace it with Command Prompt
copy cmd.exe utilman.exe
You should see:
✅ 1 file(s) copied
Now close Command Prompt and Restart.
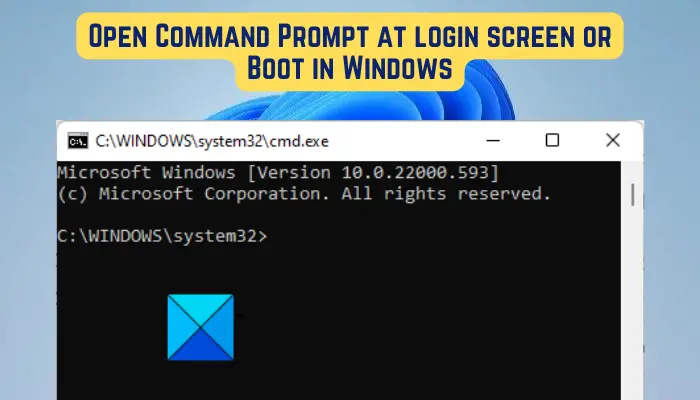
🧭 STEP 4: Open Command Prompt from Login Screen
- When login screen appears
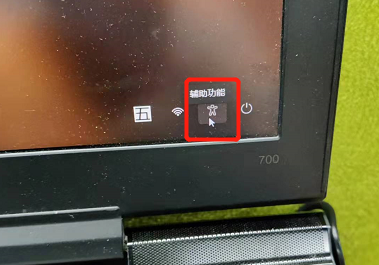
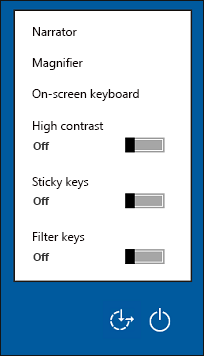
- Click Accessibility icon (♿) at bottom-right
- Command Prompt opens instead 🎉
🧭 STEP 5: Reset Password OR Create New Admin User
🔹 Option A: Create New Admin User (SAFEST)
Type:
net user admin2 /add
net localgroup administrators admin2 /add
Restart → Login using admin2
(No password needed)
🔹 Option B: Reset Existing User Password
First list users:
net user
Then reset password:
net user USERNAME NEWPASSWORD
Example:
net user Ashwani 123456
🧭 STEP 6 (VERY IMPORTANT): Restore Utility Manager
After login, open Command Prompt as Administrator and type:
cd C:\Windows\System32
del utilman.exe
ren utilman.exe.bak utilman.exe
✅ Your system is now fully normal & secure again
Overview of the Solution
The solution involves:
- Booting into Windows Recovery Mode
- Identifying the correct Windows drive
- Temporarily replacing the Utility Manager with Command Prompt
- Restarting and accessing Command Prompt from the login screen
- Creating a new administrator account
- Restoring system security to its original state
Each step is explained clearly below.
Step 1: Boot into Windows Recovery Mode
- Turn on your laptop
- When the Windows logo appears, press and hold the power button to force shutdown
- Repeat this process three times
- On the fourth startup, Windows will display Preparing Automatic Repair
Navigate through:
- Advanced options
- Troubleshoot
- Advanced options
- Command Prompt
You will now see a Command Prompt window.
Step 2: Understand Why You See Drive X:
When Command Prompt opens in recovery mode, you will see a path similar to:
X:\Windows\System32>
This confuses many users.
Important Explanation
- Drive X: is a temporary recovery environment
- It is not your real Windows installation
- System files like
utilman.exewill not exist here
This is why commands like:
dir utilman.exe
fail when run on X:
This behavior is expected and normal.
Step 3: Find the Actual Windows Drive
To locate the real Windows partition:
diskpart
Then:
list volume
Look for a volume that:
- Uses NTFS
- Has a large size (usually 50 GB or more)
- Is not labeled Boot or Recovery
Commonly, this will be C: or D:.
Once identified, exit diskpart:
exit
Step 4: Switch to the Correct Drive
If your Windows partition is C:
C:
Verify:
dir
You should see folders such as:
- Windows
- Users
- Program Files
This confirms you are on the correct drive.
Step 5: Navigate to System32
cd Windows\System32
Now verify the Utility Manager file exists:
dir utilman.exe
If you see the file listed, you are in the correct location.
Step 6: Backup Utility Manager
Before making changes, always create a backup:
ren utilman.exe utilman.exe.bak
This step is critical and ensures you can restore Windows to its original secure state later.
Step 7: Fix the “cmd.exe Not Found” Error (Very Important)
Many users encounter this error:
The system cannot find the file specified.
This happens because:
cmd.exeis running from the recovery drive (X:)- It is not accessible from C: in recovery mode
Correct Command (This Solves the Issue)
copy X:\Windows\System32\cmd.exe C:\Windows\System32\utilman.exe
If successful, you will see:
1 file(s) copied
This confirms the replacement worked.
Step 8: Restart the System Properly
Use this command:
wpeutil reboot
The laptop will restart normally.
Step 9: Access Command Prompt from Login Screen
After restart:
- Wait for the Windows login screen
- Do not enter any password
- Click the Accessibility button (bottom-right)
Instead of accessibility options, Command Prompt opens.
This confirms the process worked correctly.
Step 10: Create a New Administrator Account
Creating a new admin account is safer than modifying the original user.
Type:
net user admin /add
Then:
net localgroup administrators admin /add
This creates a new administrator-level account named admin.
Step 11: Restart Using the Admin Account
Restart from Command Prompt:
shutdown /r /t 0
Once Windows loads:
- Select user admin
- No password required
- Log in normally
You now have full access to Windows.
Step 12: Restore Windows Security (Mandatory)
This is the most important cleanup step.
After logging in:
- Open Command Prompt as Administrator
- Run the following commands:
cd C:\Windows\System32
del utilman.exe
ren utilman.exe.bak utilman.exe
This restores the Utility Manager and removes the temporary modification.
Final Outcome
At this point:
- Windows 11 is unlocked
- All files remain intact
- System security is fully restored
- You can reset your original account password or continue using the new admin account
Common Questions Answered
Does this delete my files?
No. All personal files remain untouched.
Is this safe?
Yes, if you restore utilman.exe as instructed.
Why didn’t cmd.exe copy initially?
Because recovery mode runs from a temporary X: drive.
Can this work on Windows 10?
Yes, the process is nearly identical.
Should I reset my original account password later?
Yes, once logged in, update passwords and security settings.
Conclusion
Being locked out of Windows 11 does not mean your data is lost or that reinstalling Windows is necessary. With a careful, step-by-step approach using built-in recovery tools, you can regain access safely and legally.
This guide covered:
- Recovery mode behavior
- Drive identification
- Common command-line errors
- Safe administrative access restoration

Leave a Reply