Limited Time Offer!
For Less Than the Cost of a Starbucks Coffee, Access All DevOpsSchool Videos on YouTube Unlimitedly.
Master DevOps, SRE, DevSecOps Skills!
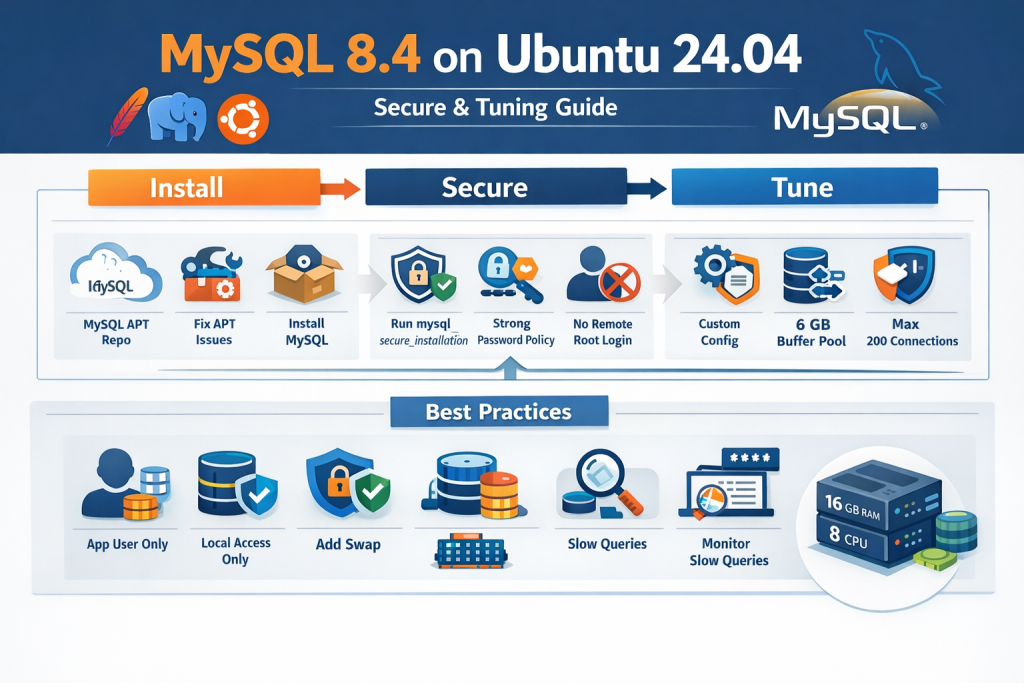
Running MySQL in production is not just about getting the service to start. A real production setup needs the right installation method, clean package management, secure defaults, sensible memory sizing, connection tuning, and a configuration that matches the rest of your stack.
If your server already runs Apache Event MPM and PHP-FPM, the MySQL setup should be designed as part of a shared application server, not as a standalone database host. That distinction matters a lot. A configuration that looks impressive on paper can easily create memory pressure, query stalls, or connection issues when MySQL is competing with PHP workers and Apache processes for the same RAM and CPU.
This guide walks through a complete practical setup based on a real production-style troubleshooting flow on Ubuntu 24.04. It covers:
- installing native MySQL Community Server instead of using bundled stacks
- fixing broken APT dependencies during installation
- hardening the server with
mysql_secure_installation - validating password policy configuration
- creating a clean custom config file
- tuning MySQL for a 16 GB RAM, 8 vCPU shared server
- binding MySQL to localhost for better security
- creating a proper application user instead of using root
- adding swap to improve resilience
- verifying that the configuration is actually loaded
The commands in this tutorial are designed to be practical and copy-paste friendly.
Why Native MySQL Is Better for Production Than Bundled Stacks
On a production server, native MySQL is the better choice over bundled stacks like XAMPP or similar all-in-one installers.
Bundled stacks are convenient for local development, but in production they introduce unnecessary complexity. You usually end up dealing with nonstandard paths, custom service wrappers, bundled binaries, and upgrade headaches. Native MySQL installed through the official MySQL APT repository integrates properly with systemd, Ubuntu package management, service control, and standard configuration locations.
For a server already running Apache Event MPM and PHP-FPM, the clean production approach is:
- Apache managed by systemd
- PHP-FPM managed by systemd
- MySQL managed by systemd
- all services configured through standard Ubuntu paths
That makes maintenance, upgrades, backups, and incident response much easier.
Server Context Used in This Tutorial
The final tuning recommendations in this article are based on a server with roughly these specs:
free -h
nproc
lsblk -o NAME,SIZE,TYPE,MOUNTPOINT
Example output:
Mem:            15Gi
CPU:            8
Disk:           400G
Swap:           0B
This is an important point. The tuning below assumes a shared server where Apache, PHP-FPM, and MySQL all run together. It is not tuned as a dedicated MySQL-only machine.
Step 1: Add the Official MySQL APT Repository
Start by downloading the MySQL APT repository configuration package.
cd /tmp
wget https://dev.mysql.com/get/mysql-apt-config_0.8.36-1_all.deb
sudo dpkg -i mysql-apt-config_0.8.36-1_all.deb
When the package configuration screen opens, choose:
- MySQL Server & Cluster:
mysql-8.4-lts
Then update the package index:
sudo apt update
At this stage, many installations continue smoothly. But in real servers, package state is not always clean. In this case, the server had broken dependencies unrelated to MySQL itself.
Step 2: Fix Broken APT Dependencies Before Installing MySQL
A common production reality is that MySQL installation fails not because of MySQL, but because Ubuntu package management is already in a broken state.
A typical error looks like this:
You might want to run 'apt --fix-broken install' to correct these.
The following packages have unmet dependencies:
 linux-headers-6.14.0-1014-aws : Depends: linux-aws-6.14-headers-6.14.0-1014 but it is not going to be installed
 mysql-server : Depends: mysql-community-server (= 8.4.8-1ubuntu24.04) but it is not going to be installed
If you see something similar, do not force MySQL installation. Fix package health first.
Start with:
sudo dpkg --configure -a
sudo apt --fix-broken install -y
sudo apt-get check
If dpkg --configure -a still reports a missing kernel-related dependency, install that exact package explicitly.
For example:
sudo apt install -y linux-aws-6.14-headers-6.14.0-1014
sudo dpkg --configure -a
sudo apt --fix-broken install -y
sudo apt full-upgrade -y
In this case, the blocker was:
linux-headers-6.14.0-1014-aws- which depended on
linux-aws-6.14-headers-6.14.0-1014
Once that package was installed, the broken dependency chain cleared and APT returned to a healthy state.
This is a good reminder that database setup often depends on general OS package hygiene. When APT is broken, fix APT first.
Step 3: Install MySQL Community Server
Once package management is healthy, install MySQL normally:
sudo apt update
sudo apt install -y mysql-server
Then enable and start the service:
sudo systemctl enable --now mysql
sudo systemctl status mysql
Expected service output should look something like this:
mysql.service - MySQL Community Server
Loaded: loaded (/usr/lib/systemd/system/mysql.service; enabled)
Active: active (running)
Status: "Server is operational"
If mysql.service is not found, do not assume MySQL is broken. First confirm that installation actually finished. A missing service usually means the package never installed successfully on that machine.
Step 4: Avoid a Very Common Mistake: Verify You Are on the Correct Server
One of the easiest ways to lose time during production setup is accidentally switching to another server and continuing the same commands there.
This happened during the troubleshooting flow. MySQL was installed and running on one host, but later commands were executed on a different host with a different prompt. That led to confusing errors like:
Failed to restart mysql.service: Unit mysql.service not found.
Command 'mysqld' not found
The root cause was simple: the commands were being run on a different machine.
Before changing configuration or restarting services, verify where you are:
hostname
hostname -I
cat /etc/os-release
This sounds basic, but in multi-server environments it saves a lot of wasted debugging.
Step 5: Run mysql_secure_installation
Once MySQL is installed and active, harden it immediately.
Run:
sudo mysql_secure_installation
You will be asked a sequence of security questions. A production-safe response pattern looks like this:
Set up the password validation component
If prompted:
Would you like to setup VALIDATE PASSWORD component?
Choose:
y
Then for policy strength, choose:
2
That corresponds to STRONG in the wizard.
Keep the existing root password or change it if needed
If you already set a secure root password during installation and it is strong enough, you can skip changing it.
Remove anonymous users
Choose:
y
Anonymous users should not exist on production systems.
Disallow root login remotely
Choose:
y
This is a very important point. It does not mean the database becomes unusable. It simply means root should not connect from remote machines over the network.
You can still:
- connect locally from the server
- use PHP applications running on the same server
- use phpMyAdmin locally if it connects via localhost or socket
Disallowing remote root login is the correct production choice.
Remove test database and access to it
Choose:
y
The test database is not needed on production.
Reload privilege tables now
Choose:
y
That applies the changes immediately.
At the end of this step, your server is already in much better shape than the default fresh install.
Step 6: Verify the Password Validation Component
If you enabled the password validation component in mysql_secure_installation, you do not need to reinstall it manually without checking first.
Login to MySQL:
sudo mysql -uroot -p
Then verify:
SHOW VARIABLES LIKE 'validate_password%';
SELECT * FROM mysql.component;
Example output:
+-------------------------------------------------+--------+
| Variable_name                                   | Value  |
+-------------------------------------------------+--------+
| validate_password.changed_characters_percentage | 0      |
| validate_password.check_user_name               | ON     |
| validate_password.dictionary_file               |        |
| validate_password.length                        | 8      |
| validate_password.mixed_case_count              | 1      |
| validate_password.number_count                  | 1      |
| validate_password.policy                        | MEDIUM |
| validate_password.special_char_count            | 1      |
+-------------------------------------------------+--------+
This output tells you something important:
- the component is already installed and active
- the current policy is
MEDIUM - minimum length is
8
Even if you selected STRONG during the wizard, always trust the actual runtime values over what you remember clicking.
Step 7: Strengthen Password Policy with SET PERSIST
Since the component is active, the correct next step is not INSTALL COMPONENT again. Instead, adjust the policy using persistent variables.
Run:
SET PERSIST validate_password.policy = 'STRONG';
SET PERSIST validate_password.length = 14;
SHOW VARIABLES LIKE 'validate_password%';
This does two useful things:
- ensures the server uses
STRONGpolicy - raises minimum password length from
8to14
That is a solid production baseline.
One subtle point is worth understanding. Even when policy is set to STRONG, dictionary-based checking depends on validate_password.dictionary_file being configured. If that field is empty, STRONG is still better than MEDIUM, but not as strict as it could be. For most application servers, setting STRONG and length 14 is already a strong improvement.
Step 8: Discover Which Config Files MySQL Actually Reads
Never guess config file paths if you can ask MySQL directly.
Run:
mysqld --verbose --help | grep -A 10 "Default options"
Example output:
Default options are read from the following files in the given order:
/etc/my.cnf /etc/mysql/my.cnf ~/.my.cnf
The following groups are read: mysql_cluster mysqld server mysqld-8.0
This tells you two important things:
- which files MySQL reads
- which config groups are valid
For server-level tuning, you should usually place settings under:
[mysqld]
Step 9: Confirm Included Directories in my.cnf
Check the main config file:
cat /etc/mysql/my.cnf
A typical Ubuntu file looks like this:
!includedir /etc/mysql/conf.d/
!includedir /etc/mysql/mysql.conf.d/
This is good news. It means you do not need to edit the base file heavily. The clean approach is to create your own custom config file inside one of the included directories.
Step 10: Create a Custom Production Config File
Create:
sudo vi /etc/mysql/conf.d/z-custom.cnf
Using a dedicated file is cleaner than editing system-supplied config directly. It also makes future audits and upgrades easier.
Step 11: Use a Shared-Server MySQL Configuration
Because this server runs:
- Apache Event MPM
- PHP-FPM
- MySQL
you should not tune it like a dedicated database machine.
A common mistake is allocating too much RAM to MySQL’s buffer pool because “more cache is better.” On a shared application server, that can starve PHP-FPM workers and create instability.
For a server with:
- 15 GiB RAM
- 8 vCPU
- 400 GB disk
- no swap
a good starting configuration is:
[mysqld]
bind-address = 127.0.0.1
default_storage_engine = InnoDB

# Main memory/cache
innodb_buffer_pool_size = 6G
innodb_buffer_pool_instances = 4
innodb_redo_log_capacity = 2G

# Connections
max_connections = 200
thread_cache_size = 100

# Temp / packet
tmp_table_size = 64M
max_heap_table_size = 64M
max_allowed_packet = 64M

# Durability / IO
innodb_flush_method = O_DIRECT
innodb_flush_log_at_trx_commit = 1

# Logging
slow_query_log = ON
long_query_time = 1
log_output = FILE
Let’s break down why these values make sense.
Understanding the Key Tuning Parameters
bind-address = 127.0.0.1
This tells MySQL to listen only on localhost.
If your Laravel app and phpMyAdmin are on the same server, this is the safest baseline. It reduces external attack surface dramatically. Remote network clients cannot connect directly to MySQL unless you change this later.
default_storage_engine = InnoDB
InnoDB should be your default engine for modern transactional applications. It supports row-level locking, crash recovery, transactions, and proper concurrency behavior for web applications.
innodb_buffer_pool_size = 6G
This is the most important performance parameter in most MySQL installations.
The buffer pool caches data and indexes in memory so MySQL does not hit disk for every read. On a dedicated database machine, people often allocate 50% to 75% of total RAM or more. But on a shared application server, that can be too aggressive.
With 15 GiB total RAM and PHP-FPM on the same box, 6G is a healthy and safe starting point. It leaves enough memory for:
- PHP-FPM workers
- Apache
- Linux filesystem cache
- per-connection MySQL memory
- temporary spikes
innodb_buffer_pool_instances = 4
With a 6G buffer pool, 4 instances is a sensible split. It reduces contention and keeps each instance comfortably above 1 GB.
innodb_redo_log_capacity = 2G
This is a practical production value for a transactional application server. It helps absorb write bursts without making recovery impractical.
max_connections = 200
Do not blindly set this to 1000 just because the server has 8 CPU cores. More connections are not always better. Each connection consumes memory, and too many idle or blocked connections can degrade performance.
For a shared PHP application server, 200 is a reasonable starting point. If your PHP-FPM process manager cannot even run 200 concurrent workers, setting max_connections much higher does not buy you anything useful.
thread_cache_size = 100
This helps MySQL reuse threads for new connections instead of constantly creating and destroying them. It is useful for web traffic where many short-lived connections are opened.
tmp_table_size = 64M and max_heap_table_size = 64M
These are deliberately kept moderate.
A very common mistake is making temporary table limits huge on systems with many connections. Since these settings affect per-session memory behavior, large values can multiply into real memory pressure under load.
64M is a safe, balanced starting point.
max_allowed_packet = 64M
This is large enough for most modern application workloads, including bigger inserts or blobs, without being excessive.
innodb_flush_method = O_DIRECT
This helps reduce double buffering between InnoDB and the operating system page cache. It is a common production choice for Linux systems.
innodb_flush_log_at_trx_commit = 1
This is the durable and safest transactional setting. It prioritizes data integrity. If you are building a serious production platform, this is the correct default.
slow_query_log = ON and long_query_time = 1
This is one of the smartest things you can enable from day one.
Many people spend hours “tuning MySQL” while the real issue is simply missing indexes or inefficient queries. Slow query logging surfaces the queries that actually need attention.
A one-second threshold is a practical starting point for web applications.
Step 12: Restart MySQL and Verify the Config Loaded
Restart:
sudo systemctl restart mysql
sudo systemctl status mysql
Then verify live values:
mysql -uroot -p -e "SHOW VARIABLES LIKE 'bind_address';"
mysql -uroot -p -e "SHOW VARIABLES LIKE 'innodb_buffer_pool_size';"
mysql -uroot -p -e "SHOW VARIABLES LIKE 'innodb_buffer_pool_instances';"
mysql -uroot -p -e "SHOW VARIABLES LIKE 'innodb_redo_log_capacity';"
mysql -uroot -p -e "SHOW VARIABLES LIKE 'tmp_table_size';"
mysql -uroot -p -e "SHOW VARIABLES LIKE 'max_heap_table_size';"
mysql -uroot -p -e "SHOW VARIABLES LIKE 'max_connections';"
mysql -uroot -p -e "SHOW VARIABLES LIKE 'thread_cache_size';"
mysql -uroot -p -e "SHOW VARIABLES LIKE 'slow_query_log';"
mysql -uroot -p -e "SHOW VARIABLES LIKE 'long_query_time';"
Example successful checks:
bind_address              127.0.0.1
innodb_buffer_pool_size   6442450944
max_connections           200
If the values are correct, your custom config file is being loaded successfully.
Step 13: Create a Dedicated Application User
Do not use root for Laravel.
This is one of the most important production habits you can build. Your application should use a restricted database account with only the privileges it actually needs.
Example:
CREATE DATABASE appdb CHARACTER SET utf8mb4 COLLATE utf8mb4_0900_ai_ci;

CREATE USER 'appuser'@'127.0.0.1' IDENTIFIED BY 'Use-A-Strong-Long-Password';
GRANT SELECT, INSERT, UPDATE, DELETE, CREATE, ALTER, INDEX, DROP
ON appdb.* TO 'appuser'@'127.0.0.1';

FLUSH PRIVILEGES;
Then in Laravel .env, use:
DB_CONNECTION=mysql
DB_HOST=127.0.0.1
DB_PORT=3306
DB_DATABASE=appdb
DB_USERNAME=appuser
DB_PASSWORD=Use-A-Strong-Long-Password
Notice the user is bound to 127.0.0.1, not %. That matches the local-only security model.
Step 14: What About phpMyAdmin?
A common question is whether disallowing remote root login breaks browser-based database access.
The answer is no, not necessarily.
If phpMyAdmin is running on the same server and connecting locally to MySQL using localhost or the socket, it can still work. What gets blocked is remote network root login from another machine, not local administration from the same host.
That said, using root in phpMyAdmin regularly is still not ideal. A better pattern is:
- keep
rootfor emergency local administration - create a separate admin user for controlled browser-based management
- give only the privileges you truly need
Step 15: Add Swap to Protect the Server
This server had no swap:
Swap: 0B
A lot of people think “no swap means more performance.” In reality, zero swap on a shared application server can make memory spikes much riskier.
You should not use swap as a replacement for RAM, but having some swap acts as a safety cushion during temporary pressure.
A 4G swap file is a practical addition here:
sudo fallocate -l 4G /swapfile
sudo chmod 600 /swapfile
sudo mkswap /swapfile
sudo swapon /swapfile
echo '/swapfile none swap sw 0 0' | sudo tee -a /etc/fstab
swapon --show
free -h
This is especially useful on servers where PHP-FPM, Apache, cron jobs, and MySQL can all create bursts of memory demand.
Step 16: Monitor Connection and Thread Behavior
After the system has been running for some time under real workload, check:
mysql -uroot -p -e "SHOW GLOBAL STATUS LIKE 'Connections';"
mysql -uroot -p -e "SHOW GLOBAL STATUS LIKE 'Threads_created';"
mysql -uroot -p -e "SHOW GLOBAL STATUS LIKE 'Connection_errors_max_connections';"
How to interpret this:
- if
Threads_createdgrows too quickly relative toConnections, increasethread_cache_size - if
Connection_errors_max_connectionsis nonzero, you may be hitting the connection limit - if the server is stable and threads are being reused well, your connection settings are probably fine
This is the right way to tune production values: start with sensible defaults, then observe real workload.
Step 17: A Few Practical Rules for Shared Apache + PHP-FPM + MySQL Servers
Do not enable every aggressive tuning trick you see online
A lot of blog posts recommend giant buffer pools, massive connection limits, disabled durability, and obscure settings without context. That is how servers become unstable.
Do not size MySQL as if Apache and PHP-FPM do not exist
Your server is shared. MySQL is not alone. Always reserve memory for the rest of the stack.
Do not use root from the application
Always create a dedicated app account.
Do not expose MySQL to the network unless you have a real reason
Keeping bind-address = 127.0.0.1 is one of the simplest and strongest security wins.
Do not guess whether config is loaded
Always verify using SHOW VARIABLES.
Step 18: A Production Checklist You Can Reuse
Here is the full production flow in compact form.
Install MySQL via official repo
cd /tmp
wget https://dev.mysql.com/get/mysql-apt-config_0.8.36-1_all.deb
sudo dpkg -i mysql-apt-config_0.8.36-1_all.deb
sudo apt update
If APT is broken, repair it first
sudo dpkg --configure -a
sudo apt --fix-broken install -y
sudo apt-get check
If a specific missing package is identified, install it explicitly.
Install MySQL
sudo apt install -y mysql-server
sudo systemctl enable --now mysql
sudo systemctl status mysql
Secure MySQL
sudo mysql_secure_installation
Recommended answers:
- validate password component:
y - policy:
2 - remove anonymous users:
y - disallow remote root login:
y - remove test database:
y - reload privileges:
y
Verify password policy
sudo mysql -uroot -p
SHOW VARIABLES LIKE 'validate_password%';
SELECT * FROM mysql.component;
SET PERSIST validate_password.policy = 'STRONG';
SET PERSIST validate_password.length = 14;
Find config path
mysqld --verbose --help | grep -A 10 "Default options"
cat /etc/mysql/my.cnf
Create custom config
sudo vi /etc/mysql/conf.d/z-custom.cnf
Use:
[mysqld]
bind-address = 127.0.0.1
default_storage_engine = InnoDB
innodb_buffer_pool_size = 6G
innodb_buffer_pool_instances = 4
innodb_redo_log_capacity = 2G
max_connections = 200
thread_cache_size = 100
tmp_table_size = 64M
max_heap_table_size = 64M
max_allowed_packet = 64M
innodb_flush_method = O_DIRECT
innodb_flush_log_at_trx_commit = 1
slow_query_log = ON
long_query_time = 1
log_output = FILE
Restart and verify
sudo systemctl restart mysql
sudo systemctl status mysql
mysql -uroot -p -e "SHOW VARIABLES LIKE 'bind_address';"
mysql -uroot -p -e "SHOW VARIABLES LIKE 'innodb_buffer_pool_size';"
mysql -uroot -p -e "SHOW VARIABLES LIKE 'max_connections';"
Create app user
CREATE DATABASE appdb CHARACTER SET utf8mb4 COLLATE utf8mb4_0900_ai_ci;
CREATE USER 'appuser'@'127.0.0.1' IDENTIFIED BY 'Use-A-Strong-Long-Password';
GRANT SELECT, INSERT, UPDATE, DELETE, CREATE, ALTER, INDEX, DROP
ON appdb.* TO 'appuser'@'127.0.0.1';
FLUSH PRIVILEGES;
Add swap
sudo fallocate -l 4G /swapfile
sudo chmod 600 /swapfile
sudo mkswap /swapfile
sudo swapon /swapfile
echo '/swapfile none swap sw 0 0' | sudo tee -a /etc/fstab
Final Thoughts
A good MySQL production setup is not about chasing “the fastest config.” It is about building a stable, secure, observable database service that fits your real application stack.
In this setup, the biggest wins came from doing the basics correctly:
- installing native MySQL through the official repository
- fixing Ubuntu package issues before forcing installation
- locking down root and removing insecure defaults
- verifying password policy instead of assuming it worked
- placing custom config in a clean included file
- tuning for a shared Apache and PHP-FPM server rather than a dedicated DB host
- creating an app user instead of using root
- adding swap to improve resilience
- verifying live values after every change
That is the difference between a MySQL service that merely starts and a MySQL service that is actually ready for production.

0 Comments
Most Voted