Limited Time Offer!
For Less Than the Cost of a Starbucks Coffee, Access All DevOpsSchool Videos on YouTube Unlimitedly.
Master DevOps, SRE, DevSecOps Skills!
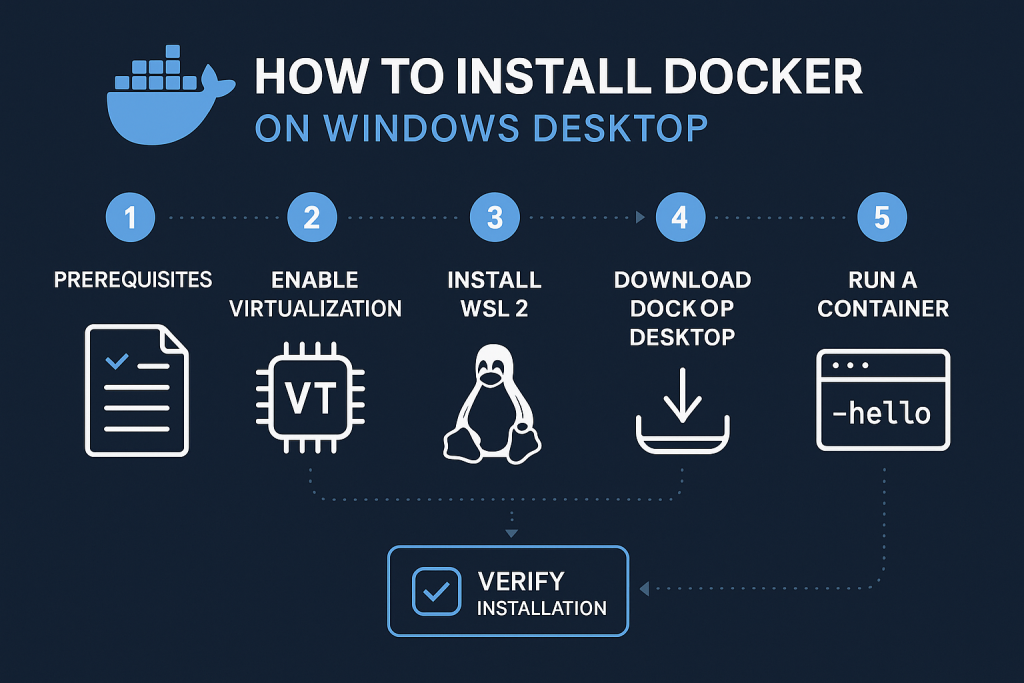
Docker has become the backbone of modern software development and deployment. It lets developers package applications and their dependencies into containers that run consistently across environments. If you’re new to Docker, this guide will take you through every step of installing it on a Windows machine — from enabling virtualization to running your first container.
By the end, you will have Docker running smoothly on your desktop, ready for local development or experimentation.
Step 1: Understanding What Docker Does
Before diving into installation, it’s important to understand what Docker actually does.
A container is like a lightweight virtual machine. It includes everything needed to run your application: the code, runtime, system tools, and libraries. However, unlike a virtual machine, it doesn’t include an entire operating system. This makes containers faster, smaller, and more efficient.
Docker provides tools to:
- Build containers (
docker build) - Run containers (
docker run) - Share containers (
docker push/docker pull) - Manage multiple containers easily
On Windows, Docker runs Linux containers through a subsystem known as WSL 2 (Windows Subsystem for Linux 2) or, alternatively, through Hyper-V. Most modern Windows installations use WSL 2 because it’s faster and more integrated.
Step 2: Prerequisites and System Requirements
Before installing Docker Desktop, confirm your computer meets the following requirements:
- You’re using Windows 10 64-bit (version 21H2 or later) or Windows 11.
- Your system has at least 4 GB of RAM (8 GB or more is better).
- Your processor supports hardware virtualization (Intel VT-x or AMD-V).
- Virtualization is enabled in your BIOS or UEFI settings.
- You have administrator rights on the computer.
- You have a stable internet connection for downloads and updates.
If your computer doesn’t meet these requirements, Docker Desktop may not function correctly.
Step 3: Check and Enable Virtualization
Docker requires virtualization to be enabled.
- Open the Task Manager by pressing
Ctrl + Shift + Esc. - Click the Performance tab, then select CPU.
- Look for a line that says “Virtualization: Enabled”.
If it says “Disabled,” restart your computer and enter the BIOS/UEFI settings (usually by pressing Del, F2, or F10 during boot). Locate the virtualization option (often under “Advanced” or “CPU Configuration”) and enable Intel Virtualization Technology (VT-x) or AMD-V.
Save the changes and reboot.
Step 4: Install WSL 2 (Windows Subsystem for Linux 2)
Docker Desktop uses WSL 2 to run Linux containers.
To install it:
- Open PowerShell as Administrator.
- Run this command:
wsl --installThis installs the necessary WSL features, the default Linux distribution (usually Ubuntu), and sets WSL 2 as the default version. - After the installation completes, restart your computer.
To verify WSL 2 is installed correctly, open PowerShell and run:
wsl --version
You should see output similar to:
WSL version: 2.0.9
Kernel version: 5.15.133.1
If you already have WSL 1 installed, upgrade your existing distribution to WSL 2:
wsl --set-version Ubuntu 2
Step 5: Download Docker Desktop
Download the latest version of Docker Desktop from the official website: https://www.docker.com/products/docker-desktop
Click the button labeled “Download for Windows (WSL 2)”.
If you prefer a direct link, you can use:
https://desktop.docker.com/win/stable/Docker%20Desktop%20Installer.exe
Save the installer to your system.
Step 6: Install Docker Desktop
- Double-click Docker Desktop Installer.exe.
- When prompted:
- Select “Use WSL 2 instead of Hyper-V” (recommended).
- Optionally, check “Add shortcut to desktop.”
- Click Install.
- Wait for the installation to complete.
- When asked, click Close and Restart.
After restarting, Docker Desktop will be available from your Start Menu.
Step 7: Launch Docker Desktop
Open Docker Desktop.
The application will take a few seconds to initialize. You’ll see a small whale icon in your system tray when it’s running.
You can verify Docker is working by opening PowerShell or Command Prompt and running:
docker --version
You should see something like:
Docker version 27.0.2, build c9a3e91
This confirms Docker has been installed correctly.
Step 8: Run Your First Container
To confirm that Docker can run containers, execute:
docker run hello-world
This command downloads a small test image from Docker Hub and runs it.
If everything is set up correctly, you’ll see:
Hello from Docker!
This message shows that your installation appears to be working correctly.
If you see this message, your Docker environment is fully functional.
Step 9: Running a Practical Example (Nginx Web Server)
Now that Docker is installed, try running a real service such as Nginx:
docker run -d -p 8080:80 nginx
This starts the Nginx web server in the background, mapping port 80 inside the container to port 8080 on your host machine.
Open your browser and visit:
http://localhost:8080
You’ll see the default Nginx welcome page.
To check running containers:
docker ps
To stop the container:
docker stop <container_id>
Step 10: Adjusting Docker Desktop Settings
Open Docker Desktop and click on the Settings menu. You can fine-tune several options:
- General → Start Docker Desktop when you log in: Enable this if you use Docker often.
- Resources → CPU and Memory: Adjust how much of your system’s resources Docker can use.
- WSL Integration: Ensure your preferred Linux distributions (like Ubuntu) are enabled.
- Experimental Features: These can be enabled if you want access to cutting-edge features.
Changing these settings can improve performance based on your development needs.
Step 11: Enabling Kubernetes (Optional)
Docker Desktop includes a single-node Kubernetes cluster for local testing.
To enable it:
- Go to Settings → Kubernetes.
- Check “Enable Kubernetes”.
- Apply and restart Docker Desktop.
Once it restarts, verify Kubernetes is running:
kubectl get nodes
Expected output:
NAME             STATUS   ROLES    AGE   VERSION
docker-desktop   Ready    master   2m    v1.30.x
This feature is optional but useful if you plan to learn Kubernetes locally.
Step 12: Common Questions and Issues
1. Docker says “WSL 2 installation is incomplete.” What should I do?
Run these commands in PowerShell as Administrator:
wsl --update
wsl --shutdown
Then restart your computer.
2. Docker fails to start after installation.
Make sure virtualization is enabled in BIOS and WSL 2 is installed.
If you have an older version of Windows 10, ensure it’s fully updated.
3. I get permission errors when running Docker commands.
Open PowerShell or Command Prompt as Administrator, or ensure your user is added to the “docker-users” group.
4. My containers can’t connect to the internet.
Disable any third-party VPN or proxy temporarily, then restart Docker.
5. How do I fix port conflicts (e.g., port 80 already in use)?
Run the container on a different host port:
docker run -d -p 8081:80 nginx
Step 13: Uninstalling Docker
If you ever need to remove Docker:
- Open Settings → Apps → Installed Apps.
- Search for Docker Desktop.
- Click Uninstall.
- Clean up leftover resources by running these commands:
wsl --unregister docker-desktop
wsl --unregister docker-desktop-data
This will completely remove Docker and its related virtual disks.
Step 14: Verifying the Installation
Here’s a quick checklist to confirm everything works:
docker --versionreturns a version number.wsl --versionconfirms WSL 2 is installed.docker run hello-worldprints the confirmation message.docker pslists your running containers.
If all of these succeed, Docker is correctly configured on your Windows system.
Step 15: Next Steps After Installation
Once Docker is working, here are a few things to explore:
- Docker Compose: Learn to define multi-container applications using a
docker-compose.ymlfile. Example:version: '3' services: web: image: nginx ports: - "8080:80" db: image: mysql environment: MYSQL_ROOT_PASSWORD: exampleRun with:docker compose up -d - Docker Hub: Browse and download prebuilt images from https://hub.docker.com.
- Build your own image: Create a
Dockerfileand build it using:docker build -t myapp . - Learn container networking and volumes: Explore
docker networkanddocker volumecommands to manage data and connections between containers.
Summary
You have successfully installed Docker Desktop on Windows, configured WSL 2, tested containers, and even learned how to run web servers locally. Docker provides a consistent, portable, and powerful environment for application development, testing, and deployment.
From here, you can extend your learning by exploring Docker Compose, Kubernetes, or cloud container services such as AWS ECS or Google Cloud Run.


Leave a Reply