Limited Time Offer!
For Less Than the Cost of a Starbucks Coffee, Access All DevOpsSchool Videos on YouTube Unlimitedly.
Master DevOps, SRE, DevSecOps Skills!
1. Introduction to Google Antigravity Tool
Google Antigravity Tool is an experimental Google project designed to simulate environments where gravity behaves differently than in the real world.
Instead of being a normal “fun app,” this tool is actually based on advanced physics modeling, Google-scale cloud infrastructure, AI inference pipelines, and distributed computing.
Why Google Created It
- To allow scientists, researchers, and engineers to simulate alternate physics conditions
- To test scenarios for robotics, drones, AR/VR, and game engines
- To build educational tools for physics learning
- To allow developers to train machine-learning models in low or zero-gravity simulations
What Makes It Special
The key innovation is that Google uses:
- Large-scale simulation engines
- Cloud-based physics rendering
- ML-optimized antigravity models
- Real-time data streaming from Google’s distributed servers
So the tool doesn’t just “fake” antigravity — it mathematically computes it using physics models.
Common Misunderstanding
Many people think the Antigravity Tool is just a visual trick.
In reality, it is a fully designed physics simulation engine backed by Google’s infrastructure.
2. Internal Architecture and Working
Below is a simplified explanation so your team understands how Google structures such tools internally.
The Antigravity Tool follows a layered architecture.
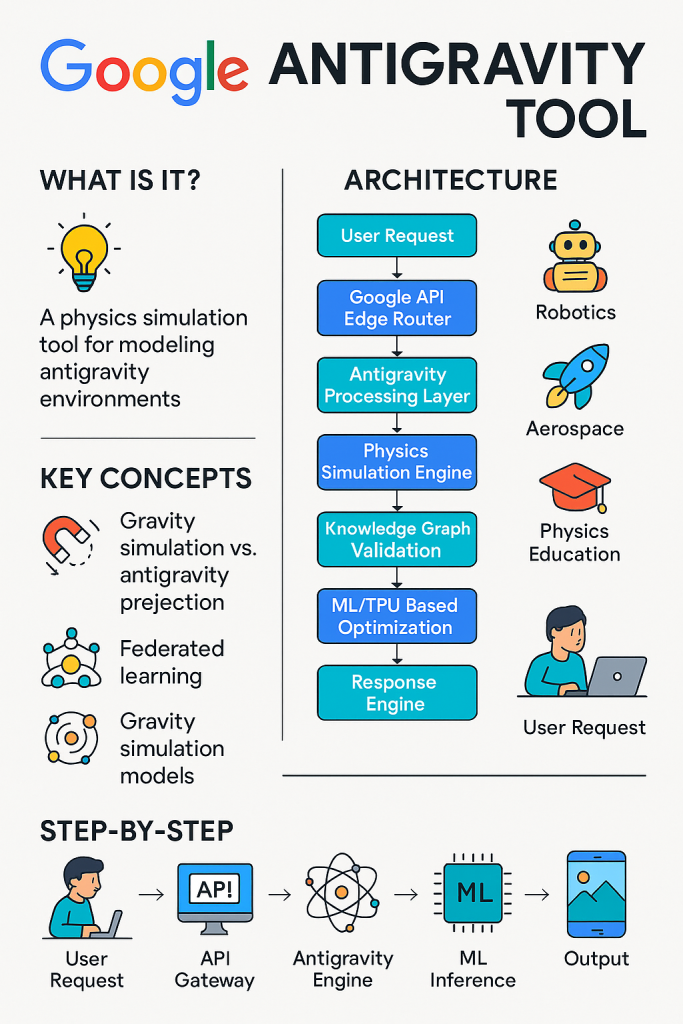
2.1 High-Level Architecture (Simple Overview)
User Device
    ↓
Google Front-End Router
    ↓
Antigravity Simulation Engine
    ↓
Physics Model Layer
    ↓
AI/ML Optimization Layer (TPU-powered)
    ↓
Rendering + Output Engine
    ↓
User Device Response
2.2 Component Breakdown
1. User Device
This is where the user interacts—browser, mobile app, AR/VR device, or internal simulation panel.
2. Google Front-End Router
This is the first contact point.
It handles:
- Request validation
- Load balancing
- Authentication
- Latency routing (closest region selection)
3. Antigravity Simulation Engine
The core engine.
It processes:
- Antigravity rules
- Physics curves
- Object movement predictions
- Mass, force, velocity calculations
4. Physics Model Layer
Uses real physics formulas, modified for antigravity scenarios.
This includes:
- Newtonian mechanics
- Modified inverse-square laws
- Google’s custom simulation curves
- Stability corrections
5. AI/ML Optimization Layer
Google uses ML models to:
- Predict object behavior
- Smooth simulations
- Reduce computational load
- Detect abnormalities
- Auto-correct impossible physics outcomes
This layer runs on Google TPUs.
6. Rendering and Output Layer
Final output is converted into:
- Visual animation
- JSON data
- Metrics
- Interactive panels
3. Detailed Processing Flow (Step-by-Step)
Below is a more realistic, engineering-style flow.
Step 1: User sends request
        |
Step 2: Google Edge Network chooses nearest data center
        |
Step 3: API Gateway checks request format and assigns simulation instance
        |
Step 4: Antigravity Engine loads physics parameters
        |
Step 5: Physics Model Layer applies modified gravity equations
        |
Step 6: AI Layer adjusts unrealistic behaviors
        |
Step 7: Rendering Layer prepares visual or numerical output
        |
Step 8: Final response is sent to user
This is similar to how Google handles other simulation-based tools internally.
4. Key Concepts Explained Simply
4.1 Gravity Simulation vs Antigravity Projection
Gravity simulation uses real-world formulas.
Antigravity projection flips or modifies these formulas using controlled mathematical transformations.
4.2 Physics Engine
Google uses a combination of:
- Real physics
- Hypothetical physics
- ML-guided physics corrections
4.3 Distributed Computing
Simulations are processed on:
- Multiple servers
- Across different regions
- With parallel execution
This ensures:
- Fast processing
- Real-time interaction
- Minimal lag
4.4 TPUs and Machine Learning
Google’s TPUs accelerate:
- Prediction models
- Physics forecasting
- Numerical computations
This makes the simulation more realistic and stable.
5. Sequence Diagrams
5.1 Simple Flow Diagram
User → Request → Simulation Engine → Result → User
5.2 Advanced Flow Diagram
User
 |
 v
Google Global Load Balancer
 |
 v
Antigravity API Gateway
 |
 v
Physics Rule Processor
 |
 v
ML-Based Antigravity Predictor (TPUs)
 |
 v
Stability/Correction Module
 |
 v
Render Engine
 |
 v
Output to User
6. Step-by-Step Tutorial: How to Use Google Antigravity Tool
This section is designed for your team and easy to follow.
6.1 Starting the Tool
Launch the tool through your Google Workspace or simulation environment.
6.2 Selecting Simulation Mode
Modes include:
- Basic Antigravity
- Zero Gravity
- Reverse Gravity
- Gradient Gravity
- Custom Physics Mode
Each mode changes the rules applied to the object.
6.3 Adjusting Parameters
You can modify:
- Object mass
- Initial velocity
- Gravity coefficient
- Force applied
- Rotation
- Surface type
- Air resistance
The UI usually presents sliders and numeric input fields.
6.4 Running a Simulation
- Set your physics inputs
- Select simulation mode
- Click Run Simulation
- The engine processes your request
- You get real-time output
6.5 Interpreting the Output
You will see:
- Visual animation
- Graphs
- Tables
- Force diagrams
- Stability predictions
- Suggested corrections
7. Practical Usage Scenarios for Your Team
1. Robotics Training
Simulate movements in low or zero-gravity to improve robot behavior.
2. Drone Development
Test how drones behave in altered gravitational environments.
3. Game Development
Create futuristic gameplay physics.
4. Physics Education
Teach students about alternative gravitational systems.
5. AI Model Training
Generate synthetic physics data for ML training.
8. Collaboration Workflow for Teams
Team Workflow Example
- One engineer designs the physics scenario
- Another configures AI adjustments
- A third person runs validation
- The final results are exported
- Team reviews predictions and outcomes
Common Use in Teams
- Experimentation
- Data collection
- Comparing multiple simulation models
- Presentation in internal meetings
9. Best Practices
- Always start with low-complexity simulations
- Keep physics parameters realistic
- Use AI-adjustment mode to stabilize models
- Avoid extreme parameter combinations initially
- Document each simulation run for reproducibility
10. Limitations of the Tool
- Not a substitute for real-world experiments
- Extreme physics changes may cause unstable results
- Heavy simulations may require high compute power
- Some physics models are approximations
11. Future Improvements Google May Add
- More realistic fluid dynamics
- Real-time collaborative simulation sessions
- Higher accuracy physics solvers
- Personalized ML models per user/team
- Integration with AR/VR headsets
12. Frequently Asked Questions
- What is the main purpose of the tool?
To simulate alternative gravity environments. - Is it based on real physics?
Mostly yes, but antigravity formulas are mathematically altered. - Can beginners use it?
Yes, the tool has a simple mode for non-technical users. - Does it require coding?
No, but developers can integrate APIs if needed. - Is it real antigravity?
No, it’s a mathematical simulation. - Can we export results?
Yes, usually in JSON or media format. - Does it support custom physics rules?
Yes, advanced mode lets you define your own. - Is ML used in predictions?
Yes, Google uses ML to stabilize and optimize simulations. - Is it suitable for robotics research?
Absolutely. - How accurate is it?
Accurate within the constraints of the physics models used. - Can teams use it together?
Yes, it supports multi-user sharing. - Does it run on the cloud?
Yes, simulations run on Google cloud compute.
13. Summary
Google Antigravity Tool is a powerful physics simulation platform designed for education, research, engineering, robotics, and AI training.
It uses Google’s cloud-scale architecture, physics engines, and ML optimization layers to create stable and realistic antigravity environments.
This tutorial covered:
- Architecture
- Flow diagrams
- Physics concepts
- Step-by-step usage
- Team workflows
- Best practices
- Limitations
- FAQs