Limited Time Offer!
For Less Than the Cost of a Starbucks Coffee, Access All DevOpsSchool Videos on YouTube Unlimitedly.
Master DevOps, SRE, DevSecOps Skills!
Images are one of the biggest contributors to website weight, especially WordPress websites where thousands of media files get uploaded over time. Large images affect page speed, search engine rankings, server storage, and hosting bills.
If you already have tens of thousands of images stored inside /wp-content/uploads, and you want to resize, compress, and overwrite them in place, ImageMagick is the most reliable tool to automate the job.
This tutorial will walk you through the entire process safely and clearly.
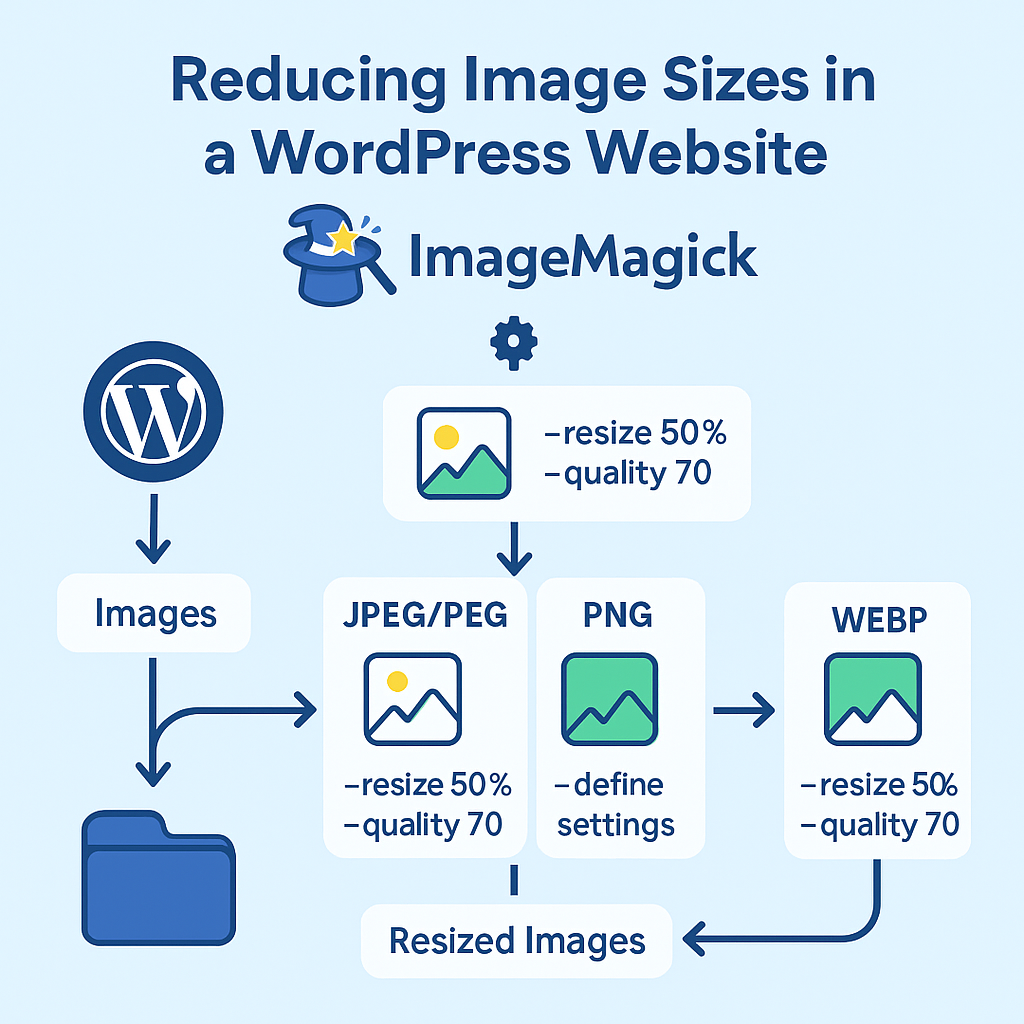
1. Understanding What We Are Trying to Achieve
Your WordPress website contains:
- JPG/JPEG images
- PNG images
- WEBP images
- Stored in thousands of subfolders, one for each month/year
- All inside:
/opt/lampp/htdocs/rajeshkumar.xyz/blog/wp-content/uploads
Your goal is:
- Resize all images to 50% of their current width & height
- Compress them to reduce file size
- Keep the same filename, same folder
- Apply this recursively to every subdirectory
- Avoid errors and warnings
- Do this safely and efficiently
ImageMagick is the perfect tool, but each image format works differently.
That is why the commands are not identical.
2. Installing ImageMagick (and Why “magick” Was Not Found)
You ran:
sudo apt update
sudo apt install -y imagemagick
Ubuntu installed ImageMagick 6.x, not 7.x.
In ImageMagick 6, the command is:
convert
mogrify
which mogrify
mogrify -version
In ImageMagick 7, the command is:
magick
This is why your system replied:
Command 'magick' not found
Nothing is wrong.
Your system uses mogrify instead of magick.
3. Finding Your WordPress Uploads Folder
Most WordPress uploads are inside:
wp-content/uploads
In your case:
/opt/lampp/htdocs/example.xyz/blog/wp-content/uploads
You may set it as an environment variable:
UPLOADS="/opt/lampp/htdocs/example.xyz/blog/wp-content/uploads"
This keeps commands cleaner and reusable.
4. Before You Modify Anything: Create a Full Backup
This step is strongly recommended.
You should always take a snapshot before modifying thousands of files.
tar -C "$(dirname "$UPLOADS")" -czf \
  "$(basename "$UPLOADS")_backup_$(date +%F).tar.gz" \
  "$(basename "$UPLOADS")"
This creates a compressed backup file in the parent folder.
If anything goes wrong, you can restore easily.
5. How ImageMagick Works With Different Image Formats
ImageMagick does not treat all image formats the same.
That’s why each format requires a different command.
JPG/JPEG
- Supports lossy compression
- Has a
-qualitysetting - Contains EXIF rotation → needs
-auto-orient
PNG
- Lossless format
- Does not support quality-based compression
- Uses compression “strategy” instead
- Does not require orientation fixes
WEBP
- Supports lossy size reduction
- Supports “quality”
- Does not use PNG compression flags
Because of these differences, each command must match the format.
6. Commands for Each Format
Below are the correct commands you can safely use.
6.1 PNG — Resize + Compress (Lossless)
Your earlier attempt produced warnings because ImageMagick 6 does not support the compression-filter flag.
This is the correct version:
find "$UPLOADS" -type f -iname '*.png' -not -path '*/cache/*' -print0 \
| xargs -0 -n 50 -P 4 mogrify -strip -resize 50% \
  -define png:compression-level=5 \
  -define png:compression-strategy=1
This reduces PNG size without losing visual quality.
6.2 JPG / JPEG — Resize + Quality Reduction (Lossy)
find "$UPLOADS" -type f \( -iname '*.jpg' -o -iname '*.jpeg' \) \
  -not -path '*/cache/*' -print0 \
| xargs -0 -n 50 -P 4 mogrify -auto-orient -strip -resize 50% -quality 70
This is the most effective size reduction.
Images become much smaller with acceptable quality.
6.3 WEBP — Resize + Quality 70 (Lossy)
find "$UPLOADS" -type f -iname '*.webp' \
  -not -path '*/cache/*' -print0 \
| xargs -0 -n 50 -P 4 mogrify -strip -resize 50% -quality 70
This also reduces size dramatically while keeping good quality.
7. Understanding Why These Commands Are Different
This was your specific question, and here is the clear summary:
- PNG is lossless → uses compression strategy instead of quality
- JPG is lossy → requires
-quality, supports-auto-orient - WEBP is modern lossy → supports
-quality, no PNG flags - Each format has a different internal compression engine
Therefore, each command matches the technical behaviour of the format.
8. How To Skip WordPress Auto-Generated Thumbnails
WordPress creates many variants like:
image-150x150.jpg
image-300x300.png
image-1024x768.webp
If you want only original images, add this filter:
-not -regex '.*-[0-9]\{2,4\}x[0-9]\{2,4\}\..*'
Example for JPG:
find "$UPLOADS" -type f \( -iname '*.jpg' -o -iname '*.jpeg' \) \
  -not -path '*/cache/*' \
  -not -regex '.*-[0-9]\{2,4\}x[0-9]\{2,4\}\.jpe*g' \
  -print0 \
| xargs -0 -n 50 -P 4 mogrify -auto-orient -strip -resize 50% -quality 70
This prevents altering preview images WordPress uses internally.
9. How To Resize Only Large Images (Optional)
If you want to resize only “big” images, not small ones:
-resize '2000x2000>'
The > symbol means “resize only if larger than”.
Example:
mogrify -resize '2000x2000>' -quality 70
10. Performance Tips for Tens of Thousands of Images
When processing 10,000+ images, a few adjustments matter:
Use parallel execution
-P 4 means 4 parallel processes.
If your CPU is strong, set -P 8 or -P 12.
Use batches
-n 50 processes 50 files per batch.
You can increase it to 100 for faster operations.
Avoid cache folders
The parameter -not -path '*/cache/*' avoids duplicate or unnecessary files.
Use SSD if possible
Image resizing is CPU + disk intensive.
11. How To Verify That Compression Worked
Pick a file and run:
identify -verbose file.jpg | grep "Geometry"
And:
ls -lh file.jpg
Compare:
- Before and after image size
- Pixel dimensions
- Orientation
- Metadata presence
12. What To Do If Something Goes Wrong
Since you took a tar backup, restoring is simple:
tar -C "$(dirname "$UPLOADS")" -xzf uploads_backup_YYYY-MM-DD.tar.gz
This overwrites all images with their original versions.
How to Fix wpDiscuz Not Replacing Default WordPress Comments in Block Themes
Limited Time Offer! For Less Than the Cost of a Starbucks Coffee, Access All DevOpsSchool Videos on YouTube Unlimitedly. Master DevOps, SRE, DevSecOps Skills! Enroll Now Many…