Limited Time Offer!
For Less Than the Cost of a Starbucks Coffee, Access All DevOpsSchool Videos on YouTube Unlimitedly.
Master DevOps, SRE, DevSecOps Skills!
If your website is hosted on a server — especially one that serves WordPress or custom HTML content — securing it is not optional, it’s a necessity. Whether you’re using a VPS, dedicated, or cPanel shared hosting (like with GoDaddy), knowing who accessed your server and what they might have done is a crucial step in preventing website hacks, data theft, and search engine blacklisting.
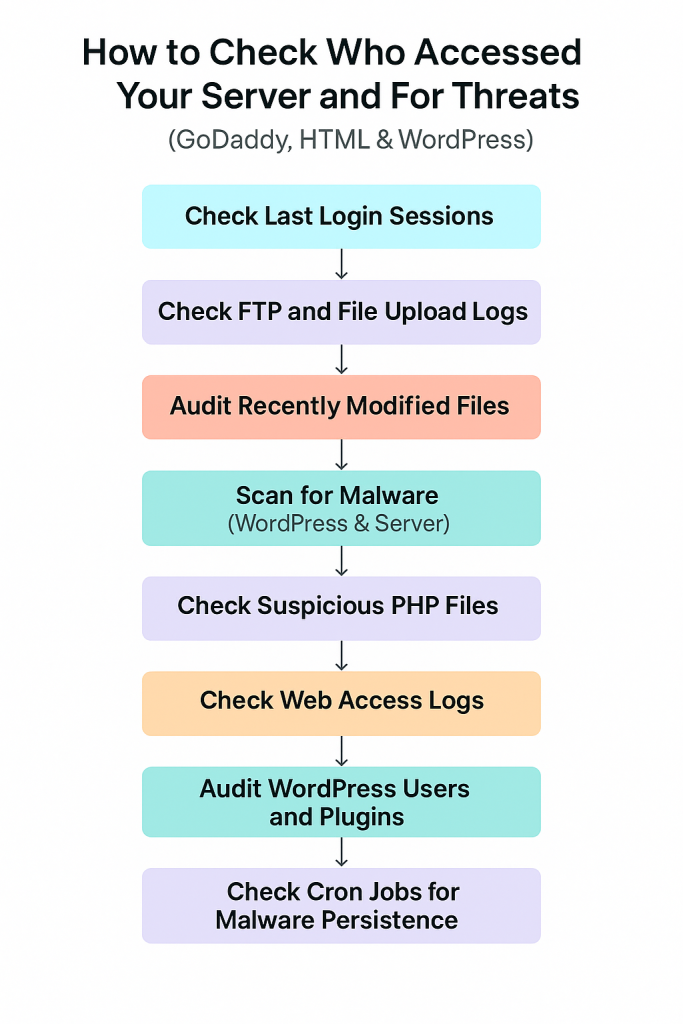
This guide walks you through how to check server access, investigate unauthorized activity, and detect threats, with a special focus on WordPress and HTML website environments.
Step 1: Understand the Setup
Before anything, understand how your site is hosted:
- Shared hosting (cPanel, no root access): Limited server control
- VPS/Dedicated (SSH/root access): Full control
- Managed WordPress (GoDaddy Pro): Limited server, but enhanced WordPress management
Why this matters? Because the way you detect access logs and malware differs based on access level.
Step 2: Check Who Accessed Your Server (Login Monitoring)
If your server allows SSH (VPS or dedicated hosting), log in and run:
last -a | head -n 20
This command lists the last 20 login sessions — showing:
- Username
- IP address
- Time of login
If someone unknown appears here, it’s a red flag.
For cPanel:
- Go to Raw Access Logs under Metrics
- Download the logs for any suspicious activity
Look for:
- Access from unfamiliar IPs
- Brute force attempts
- Suspicious user-agents like
python-requestsorcurl
Step 3: Check FTP Access
If someone accessed your site through FTP or File Manager, look for logs:
On VPS:
cat /var/log/messages | grep ftp
On GoDaddy shared hosting:
- Login to cPanel
- Open File Manager > Logs > Raw FTP Logs (or check FileZilla logs if you used it)
Look for:
- Connections from unknown locations
- File uploads to suspicious paths (
/wp-content/uploads,/html/tmp, etc.)
Step 4: Identify Recently Modified or Created Files
One of the first things attackers do is modify or upload malicious scripts. Detect this with:
sudo find /var/www/html -type f -mtime -2
This shows files modified in the last 2 days. You can change -2 to -7 for a week.
Pay special attention to:
wp-config.phpindex.php,index2.php, or anything unusual.ico,.php, or.phtmlfiles inwp-content/uploads/
Step 5: Look for Hidden Malware in PHP Files
Most malicious PHP scripts use obfuscated code. Search for patterns like base64_decode, eval, or gzinflate:
grep -r --include="*.php" "base64_decode" /var/www/html
Don’t panic if these terms appear in known plugins/themes — they’re sometimes used for valid reasons. However, if they appear in strange locations or in large, unreadable blobs of code, investigate further.
Step 6: Monitor WordPress Admin Users
Attackers sometimes create fake admin accounts. To review:
- Login to WordPress Dashboard
- Go to Users → All Users
- Look for unfamiliar accounts, especially with:
- Admin role
- Generic names like
test,admin2,wpuser, etc.
If you find anything suspicious, delete the user and change all admin passwords immediately.
Also consider installing a plugin like Activity Log to track admin actions going forward.
Step 7: Scan for Malware
For WordPress:
Install a security plugin such as:
- Wordfence (free and powerful)
- Sucuri
- MalCare
These tools will:
- Scan files for malware
- Check file integrity against original WP core
- Block known malicious IPs
- Show you when the site was changed and by whom
For VPS/Dedicated Server:
Run a ClamAV scan:
sudo apt update
sudo apt install clamav
sudo freshclam
sudo clamscan -r /var/www
Or:
sudo apt install rkhunter
sudo rkhunter --check
These tools scan for:
- Rootkits
- Known malware signatures
- Unauthorized cron jobs
Step 8: Review Access Logs from Web Server
Apache:
sudo cat /var/log/apache2/access.log
Nginx:
sudo cat /var/log/nginx/access.log
What to look for:
- Unusual spike in POST requests
- Repeated access to
xmlrpc.php(often a bot attack) - Requests to nonexistent
.phpfiles (indicates probing)
Example:
cat access.log | grep ".php"
If you’re seeing requests to /wp-content/uploads/shell.php, that’s almost certainly malicious.
Step 9: Check Scheduled Cron Jobs
Malware often reinfects websites using cron jobs.
crontab -l
sudo crontab -l -u www-data
If you see unfamiliar jobs (like a curl to an unknown site or running a PHP file), delete them.
Step 10: Harden Your Server and Site
Once cleaned, secure your site to prevent future threats:
- Disable XML-RPC in WordPress if not used
- Block wp-login.php access to known IPs via
.htaccess - Use SFTP, not FTP
- Set file permissions properly (e.g.,
644for files,755for folders) - Use a firewall plugin or WAF (Cloudflare, Sucuri)
- Disable file editing in WordPress with:
define('DISALLOW_FILE_EDIT', true);
Final Thoughts
Security is not a one-time task. It’s an ongoing process of:
- Monitoring logs
- Updating software
- Auditing users
- Responding quickly to anomalies
If you feel you’ve been compromised, don’t just fix the visible damage — trace the entry point, remove the root cause, and then rebuild trust with your users.